
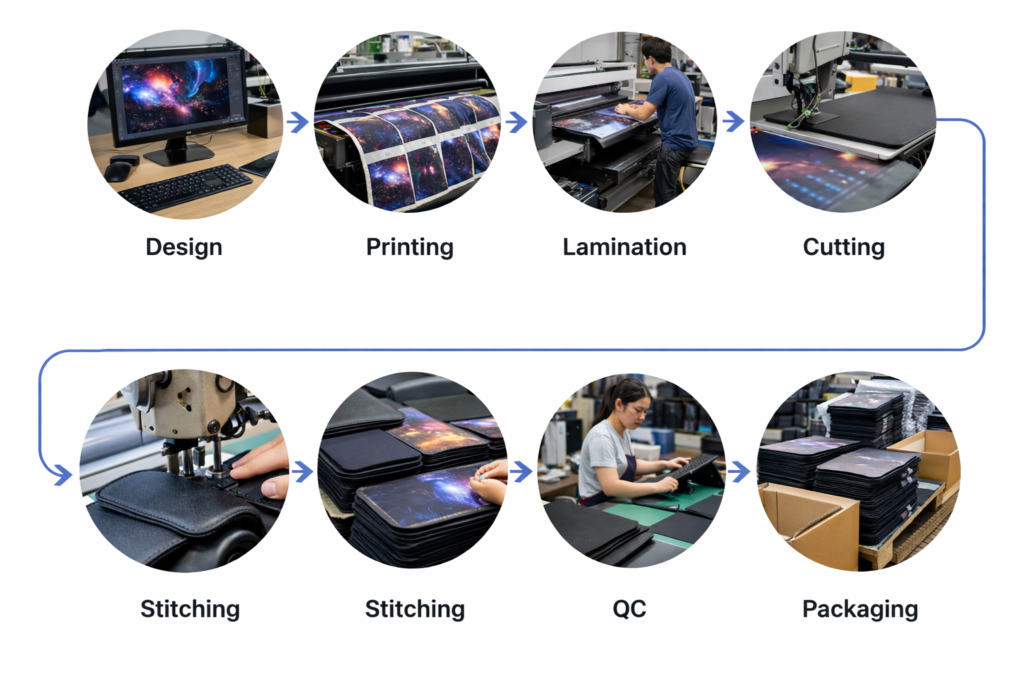
As the global demand for gaming mouse pads grows, businesses often seek a reliable mouse pad manufacturer to produce large orders. If you’re looking for a bulk mouse pad supplier or planning a custom mouse pad order, it helps to understand how these products are made at the factory level. The following sections break down each production stage – material selection, rubber mixing, foam processing, printing, cutting, quality control, packaging, and shipping – providing a detailed, factory-floor perspective on the mouse pad manufacturing process.
Summary
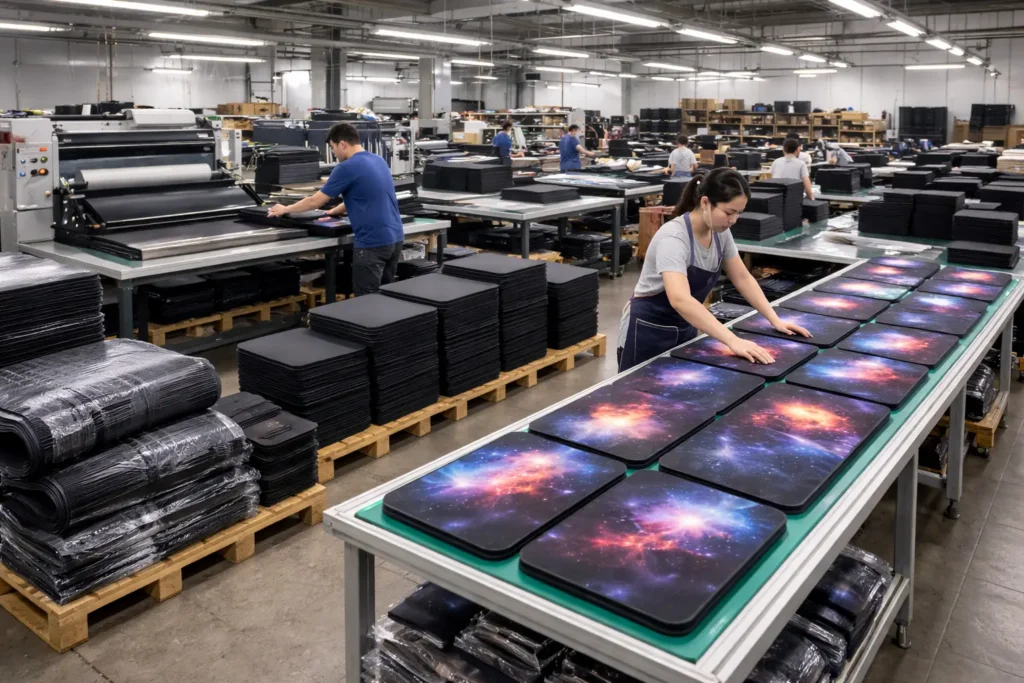
- Integrated Production: Modern factories often handle everything in-house from rubber foam mixing to final packaging, ensuring quality control at each step. Working with a manufacturer that controls the full process helps maintain consistency for bulk orders.
- Quality Materials: The process starts with selecting high-quality raw materials. Natural or synthetic rubber is chosen for the base (each with its own benefits in elasticity and durability), and a specialized cloth (typically polyester) for the surface that accepts vibrant prints.
- Precision Process: Raw rubber is compounded with additives and then vulcanized into foam sheets, often simultaneously heat-laminated with the fabric layer to avoid glues. After curing, large sheets are printed with custom designs (via sublimation or screen printing) and cut to size with precision dies or lasers. Optional edge stitching can be added for extra durability.
- Thorough Quality Control: Every pad undergoes inspections for size, flatness, print clarity, and adhesion. Manufacturers also perform tests for wear, flexibility, and environmental resistance to ensure the pads meet B2B clients’ performance standards.
- Bulk Packaging & Shipping: Finished mouse pads are packed in protective bags or custom boxes, then boxed in bulk cartons ready for shipment. Factories design packaging to safeguard the pads in transit. Efficient logistics planning and communication ensure that even large bulk orders ship on schedule, with timelines optimized by overlapping production steps where possible.
Now, let’s dive deeper into each stage of the manufacturing process to see what really happens inside a mouse pad factory.
Material Selection
Selecting the right materials is the foundation of a quality mouse pad. Factories typically source two primary components: the rubber for the base and the cloth for the top surface. Rubber Base: Manufacturers may use natural tree-derived rubber or synthetic rubber compounds (such as neoprene or SBR). Natural rubber offers excellent elasticity and grip, while synthetic rubber provides better aging resistance and often lower cost. In either case, the rubber is usually formulated as a soft sponge foam that gives the mouse pad its cushioning and anti-slip properties. Fabric Surface: For the top, a tightly woven polyester fabric is most common. Polyester is ideal because it can be dye-sublimated with high-resolution graphics and it bonds well to rubber during curing. The fabric’s weave (texture) is chosen based on the desired mouse glide: a fine weave for speed, or a rougher weave for control. Other materials like lycra or microfiber may be used for specialty pads, but the key is that the fabric must be durable and able to accept ink or dye without fading.
During material intake, quality checks are performed. Rubber batches are inspected for purity and consistency (no excessive odor or contaminants), and fabric rolls are checked for even texture and no flaws. High-quality input materials set the stage for smooth production. In some advanced factories, materials are even custom-formulated: for example, ordering rubber with specific hardness or a fabric with a certain thread count to meet a client’s requirements. This emphasis on material quality and customization at the start ensures the final mouse pads will meet performance expectations.
Rubber Mixing
Once the raw rubber is selected (natural or synthetic), the factory moves on to mixing and compounding it into a workable formula. Rubber mixing is typically done in an industrial mixer (such as a Banbury mixer or two-roll mill) where raw rubber gets combined with various additives. These additives include fillers (to reinforce the rubber), plasticizers (to adjust flexibility), and vulcanizing agents like sulfur or peroxides (which will later help cure the rubber into a solid form). The exact recipe – often called a formula – is designed by the manufacturer’s chemists to achieve the desired hardness, elasticity, and durability for the mouse pad base. For example, a softer pad might have more plasticizer for flexibility, while a pad meant for a warm climate might include stabilizers to prevent it from becoming sticky.
Temperature and timing are critical during mixing. The rubber and additives are blended under controlled heat, but the factory must avoid letting it get too hot. Overheating during this stage could trigger premature vulcanization (curing) of the rubber, which would ruin the batch. Skilled operators or automated systems monitor the mixer’s temperature and mixing speed closely. The output of this stage is a uniformly mixed rubber compound, usually in the form of thick sheets or slabs. These slabs are black or off-white in color and have a dough-like consistency when warm. Once the compound is homogeneous and has passed quality checks (for example, a sample piece might be tested for hardness or elasticity), it’s ready for the next stage: forming it into the foam sheets that will become mouse pads.
Foam Processing (Forming the Rubber Base)
After mixing, the rubber compound must be formed into the characteristic foam sheet that gives a mouse pad its body. In a professional factory, this foam processing stage often involves heat, pressure, and sometimes chemical blowing agents to create a soft, spongy texture. There are two common approaches:
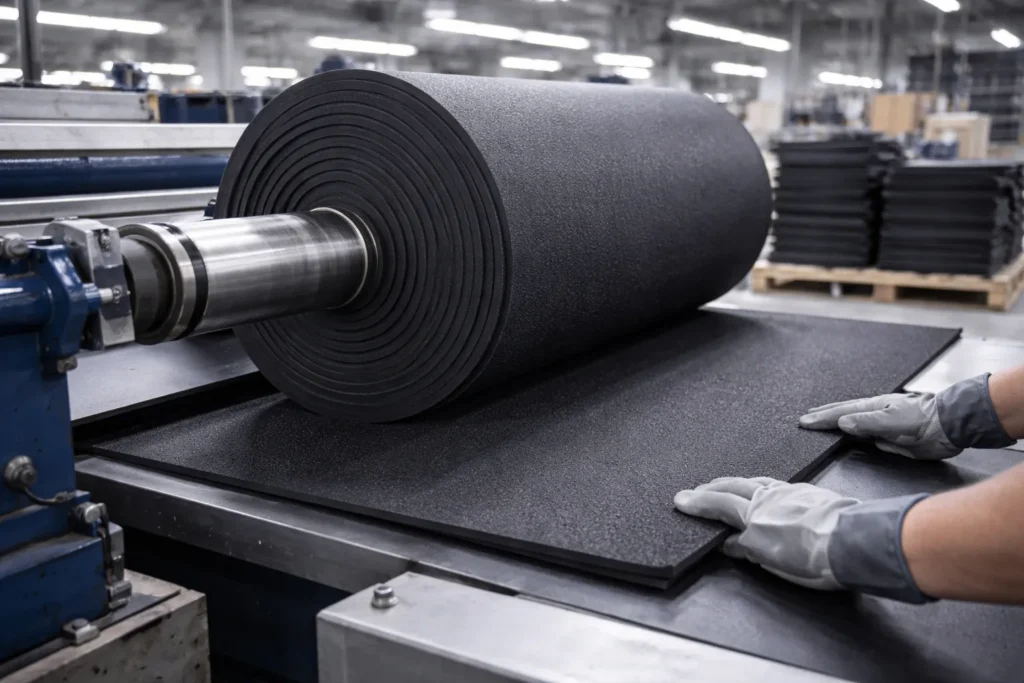
- Compression Molding (Sheet Vulcanization): The mixed rubber is placed into large flat molds or onto a conveyor, often together with the top fabric layer, and then heated under high pressure. In one method, the compound is spread into a sheet and a layer of polyester fabric is laid on top; the assembly is then cured in a hot press. The heat causes the rubber to vulcanize (harden) and expand into a foam, while pressure ensures it bonds firmly to the fabric. This effectively laminates the mouse pad in one step, with the fabric and rubber becoming one piece. Notably, many manufacturers avoid glue at this stage – instead, they rely on the vulcanization process to fuse the layers. The fabric is applied while the rubber is semi-molten; as the rubber cures and cools, it locks the fabric in place. This produces a very durable bond without the use of adhesives (which can be toxic or prone to delamination).
- Continuous Roll Lamination: In some cases, factories have continuous production lines. They feed the rubber compound through rollers to form a continuous sheet and simultaneously feed in the fabric, using heated rollers or an oven to cure the rubber and press the fabric on. The output is a long roll of fabric-faced rubber foam, typically in a standard width (e.g. 1–1.5 meters). This roll can later be cut into individual pads. Many mid-sized manufacturers source pre-made laminated rolls of mouse pad material and skip directly to printing and cutting, but larger ones do it in-house for better quality control.
Regardless of method, the result of foam processing is large sheets (or rolls) of mouse pad material: a spongy rubber base permanently bonded to a top cloth. These sheets might be produced in generic colors (often the rubber is black and the fabric is white or black if printing will occur later). Factory workers will trim off any excess flash or uneven edges from the sheets. At this point, we have something that looks like a giant unprinted mouse pad mat. The thickness is consistent (common thicknesses are 2mm, 3mm, or 4mm) and the sheet has the desired feel – flexible, with good grip on the bottom and a smooth surface on top.
Printing the Surface Design
With the blank mouse pad material ready (rubber bonded to cloth), the factory turns to printing the surface design. This is where a customer’s logo, artwork, or any decorative pattern is applied. There are a couple of primary printing methods used:
- Dye Sublimation Printing: This is very popular for full-color designs, especially in gaming mouse pads. The process involves printing the desired image on special transfer paper using sublimation inks, then using a large heat press to infuse the image into the mouse pad’s fabric. Under high temperature, the ink on the transfer paper turns into gas and permeates the polyester fabric of the pad, dyeing it permanently. Sublimation is prized because it yields vibrant, photo-quality images that are actually embedded in the cloth – you cannot feel any ink on the surface at all. The colors are durable and won’t crack or peel since they are part of the fabric fibers. In the factory, workers may print a whole batch of designs on transfer paper, lay them on top of the blank white pads, and run them through a large format heat press simultaneously, or do them one by one for smaller runs. Temperature (~200°C) and time (around 30–60 seconds) are carefully controlled to ensure true color reproduction without scorching the rubber.
- Screen Printing: For simpler designs (like a single-color company logo) or very large production runs, screen printing is another common technique. Here, a fine mesh screen stencil of the artwork is made. The screen is placed over the mouse pad surface and ink is pressed through the mesh onto the fabric. Factories might use automatic screen-printing machines that can print multiple pads in one go (each pad under a screen head), which is efficient for one- or two-color graphics. The ink used is usually a special fabric ink that will adhere to the polyester. After printing, the pads go through a drying tunnel or are left to air-dry so that the ink cures and becomes permanent. Screen prints create a thin layer of ink on top of the fabric, which can be felt slightly if thick, but are cost-effective for simple jobs. Proper drying is important to avoid smudging and to ensure the print doesn’t fade or wash out.
Some factories also use digital direct printing or UV printing for mouse pads, where inkjet printers deposit ink directly onto the pad. These are less common for cloth pads (more often used for hard surface pads) but can produce detailed images without transfer paper.
After printing, the newly decorated sheets or individual pads undergo an inspection for print quality. Technicians check that colors are accurate and consistent, and that there are no printing defects (like misalignment, blotches, or incomplete ink transfer). In sublimation, if any moisture or temperature issue occurred, it might cause a blurry print or slight color shift, so those are filtered out at this stage.
Cutting and Edge Finishing
Once the mouse pad graphics are applied, the next step is to cut the large sheets into individual pads (unless they were printed one-by-one). Factories have specialized cutting equipment for this task. For standard shapes (like rectangles and circles), a common method is using steel rule dies in a hydraulic press (die cutting). The die is a cookie-cutter like blade that punches out the mouse pad shape from the sheet. This ensures every pad is exactly the same size with smooth, uniform edges. Another method is computer-controlled cutting: for example, using a CNC laser cutter or blade cutter, which is especially useful for custom shapes or smaller batches because it doesn’t require making a physical die. Laser cutting can seal the edges nicely but must be calibrated so it doesn’t scorch the fabric.
Cutting might seem straightforward, but there are some interesting nuances. The orientation of how pads are cut from the roll or sheet can affect both material usage and the pad’s performance. Manufacturers plan the cut layout to minimize waste, as unused gaps cost money. For instance, choosing a horizontal vs. vertical arrangement on a roll can result in 10–20% difference in material waste. Moreover, the fabric on mouse pads has a slight “grain” direction. Factories are aware that if all pads are cut with the grain running the same way, the glide feel will be consistent. If one batch was cut rotated 90 degrees relative to another, the user might feel a difference in mouse movement friction. So an experienced factory optimizes the cutting pattern for both efficiency and product consistency.
After cutting, each mouse pad’s edges are inspected. At this stage, some premium mouse pads receive an edge stitching (also known as binding) process. This is when a sewing machine stitches a thin nylon thread around the perimeter of the pad. Edge stitching reinforces the pad, preventing the fabric layer from fraying or peeling up over time. Not all pads have this (it adds to cost), but many gaming-grade pads do. Factories that offer stitched edges will have workers or automated sewing machines do this immediately after cutting. It’s a delicate process to ensure the stitching is even and doesn’t waver onto the printed area. Note that whether the pad is stitched before or after printing is planned carefully; some manufacturers print first then stitch, while others stitch a blank pad then print over the stitches – each approach has trade-offs in graphic alignment and flatness.
By the end of cutting (and stitching if applicable), we have individual mouse pads in their final shape. They are stacked up and ready for rigorous inspection before they get packaged.
Quality Control (QC) and Inspection
Every mouse pad, especially in a bulk order, undergoes quality control checks to ensure it meets the required standards and specifications. Factories pride themselves on catching any defects before products are shipped out. QC for mouse pads includes both visual inspections and physical tests:
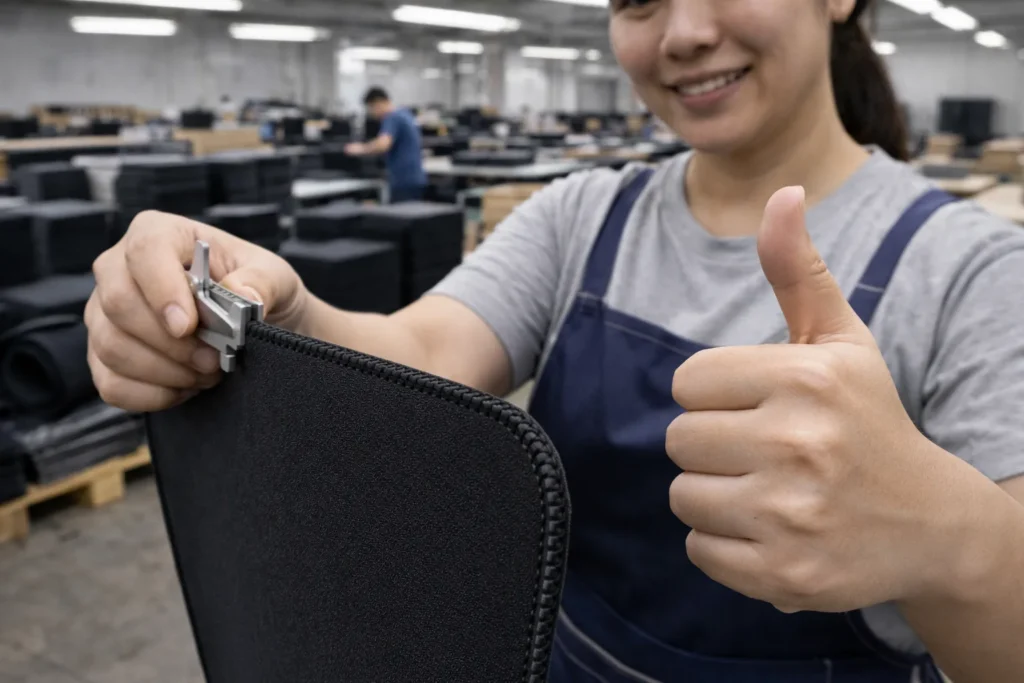
- Visual and Dimension Inspection: Trained inspectors or machines measure the length, width, and thickness of random samples to make sure each pad matches the intended size within tolerance. They also verify the shape is correct (for example, corners are properly rounded if it’s a rectangle, or the circle is perfectly round). The surface is scrutinized under good lighting for any print errors, discoloration, or blemishes. Logos and designs must be sharp and properly aligned. If a pad has even slight off-centering of a graphic that a client would notice, it may be rejected. The edges are checked for smoothness – no nicks or incomplete cuts. For stitched edges, QC ensures there are no loose threads or missed stitches. Using tools like calipers and measurement jigs, the factory ensures consistency across the entire batch.
Beyond looks and size, factories perform a battery of tests on sample pads to guarantee performance:
- Surface Flatness and Adhesion: One check is for surface flatness – the pad should lie flat on a desk without curling. Inspectors might place the pad on a flat table to see that all edges contact the surface (no warping). They also gently peel at the fabric on the edges to ensure it’s tightly bonded (there should be no lifting or bubbles where fabric separates from rubber).
- Rubber Hardness and Elasticity: Some factories use durometer tools to measure the foam’s hardness/softness. If the spec was, say, 60 Shore A, they confirm the batch is in that range. They may also bend and flex the pad – a good pad should bend without cracking and spring back flat. Elasticity tests ensure the pad isn’t too stiff or too floppy for user comfort.
- Durability Tests: To simulate long-term use, sample pads undergo abrasion testing (a machine might rub a weighted object on the surface repeatedly to see if the print wears off or if the fabric pills). They might also do a wash test if the pads are advertised as washable. Some labs within the factory perform environmental aging: for instance, heating a pad to a high temperature and then cooling it to ensure no delamination, or checking that there’s no strong odor emitted at warm temperatures (a common requirement for rubber products). In higher-end production, tests for water resistance (spilling water on the surface to see if it seeps through or if the coating repels it) and even chemical resistance (like sweat or solvents) can be done. These tests are often done on sample pads from the batch, not every unit, to validate the process.
Only once a batch passes all these checkpoints will the order move to packaging. Any pad that fails – whether it’s a misprint, a wrong size, or has any defect – is typically culled out. The factory might recycle those by stripping the fabric to reclaim rubber, or they are discarded. For a large bulk order, the manufacturer prepares a quality report that includes the results of key inspections. This level of QC ensures B2B clients receive mouse pads that are uniform and meet the promised specifications in terms of size, look, and feel.
Packaging
After inspection, the flawless mouse pads are ready to be packaged. Good packaging in a mouse pad factory serves two purposes: protecting the product and aligning with branding/marketing requirements.
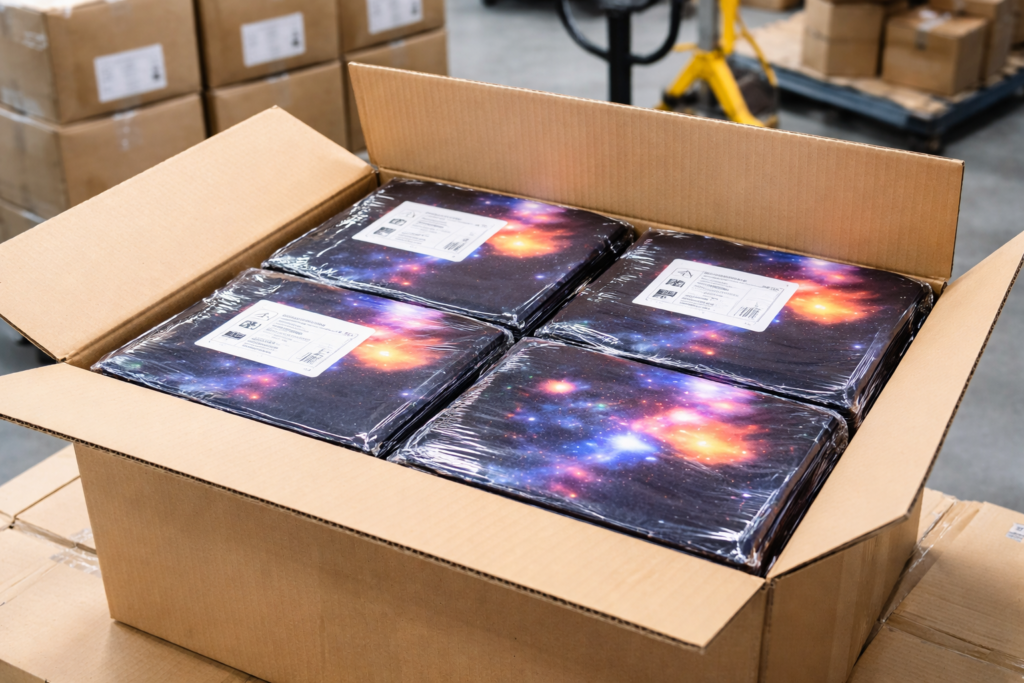
In the packaging area, workers (often wearing gloves to avoid smudging the fresh pads) will first ensure each pad is clean – sometimes wiping off any dust. The standard practice is to pack each mouse pad in an individual plastic polybag. These clear OPP bags keep the pads free from moisture and dirt during transit. For retail-oriented orders, the factory can insert paper backings or header cards into these bags with branding, product information, or barcodes. Some clients opt for a custom printed box for each pad instead of a polybag; in those cases, the flat pad is inserted into a snug cardboard box with attractive graphics. (Creating such custom packaging usually requires higher order quantities due to printing MOQs.)
Pads are counted and grouped as required (for instance, 50 pads per inner carton, or whatever the client requests). The team will place them into shipping cartons, which are sturdy corrugated boxes. Inside the cartons, additional precautions like silica gel packets (for humidity control) or bubble wrap layers might be added, especially if the pads have electronics (like an RGB lighting mouse pad, which includes a USB module) or if they are being shipped long-distance by sea. Factories design the packing such that the pads fit perfectly without rattling around. A well-designed packaging approach prevents any creases or dents – important because a crease in a mouse pad can ruin its flatness.
On the outside of the cartons, labels are applied indicating the product, quantity, weight, and handling instructions (e.g., “Do not stack more than X high”, “Keep Dry”). Packaging isn’t just functional; manufacturers know that attractive, informative packaging adds value for clients. Thus, they often collaborate with the client on packaging artwork and specifications before production. Ultimately, the packaging is aesthetically pleasing and protects the mouse pads during transportation, striking a balance between form and function.
Shipping and Logistics
The final stage inside the factory is coordinating the shipping and logistics to deliver the mouse pads to the client, which could be halfway around the world. Once cartons are sealed and palletized (stacked on pallets and wrapped, if a large shipment), the factory’s logistics team takes over. They schedule pickups with freight carriers or arrange container loading for ocean shipment, depending on the agreed shipping method (air freight for fast delivery, sea freight for economy on large volumes, or even express courier for smaller batches).
Before the goods leave, the factory double-checks all counts against the purchase order. Documentation is prepared, including packing lists, commercial invoices, and any certificates needed (for example, material safety data if required, or customs paperwork). Trustworthy manufacturers implement various protective measures during transportation – using moisture-barrier liners in containers if shipping by sea (to prevent humidity damage), ensuring pallets are correctly secured, and sometimes even placing data loggers to monitor conditions of the cargo.
It’s worth noting that the actual production of mouse pads is usually swift – a well-equipped factory can output several thousand pads in a week easily. However, total delivery time depends on factors beyond just factory floor speed. Upfront processes like sample approval, artwork confirmation, and raw material sourcing can add days or weeks before mass production starts. For instance, sourcing custom-printed boxes might have a lead time, or waiting for a client to approve a pre-production sample could pause the schedule. A seasoned factory will communicate these steps clearly to manage expectations. They often perform different stages in parallel (for example, while the first batch of pads is printing, the earlier ones might already be in cutting or QC) to compress the overall timeline.
To give a clearer idea, here is a typical timeline breakdown from order to shipment for a bulk mouse pad production, assuming all materials and approvals are ready:
| Production Stage | Approximate Duration (for a large order) |
|---|---|
| Material sourcing & preparation | 3–5 days (if not already in stock) |
| Rubber lamination (foam+fabric) | ~2 days (in-house or outsourced) |
| Printing (and drying time) | 3–4 days (for full-color sublimation) |
| Cutting (and edge stitching) | 1–2 days (may overlap with printing) |
| Quality Control | 1 day (thorough batch inspection) |
| Packaging and dispatch | 1 day (boxing and pickup) |
| Total typical lead time: | ~7–14 days production + shipping |
This timeline can overlap and varies by factory; a rush order can sometimes be completed even quicker by expediting each step, whereas a complex order (very large quantity or multiple designs) might take longer. Shipping itself will add transit time on top (e.g., ocean freight might be 3–6 weeks, air freight 3–7 days). The key point is that efficient factories optimize the workflow so that the client receives their bulk order on schedule without compromising quality.
In summary, inside a mouse pad factory each stage is executed with precision: from formulating the rubber compound and fusing it with fabric, to applying high-definition prints, to cutting with millimeter accuracy and checking every pad by hand and machine. By understanding this process, B2B clients can better appreciate the value a capable manufacturer brings – ensuring that their custom mouse pad orders are produced consistently, cost-effectively, and with high quality from start to finish. With experience, expertise, and rigorous quality standards at every step, a top-tier factory turns raw rubber and rolls of cloth into thousands of flawless mouse pads ready to ship out to the world.
