
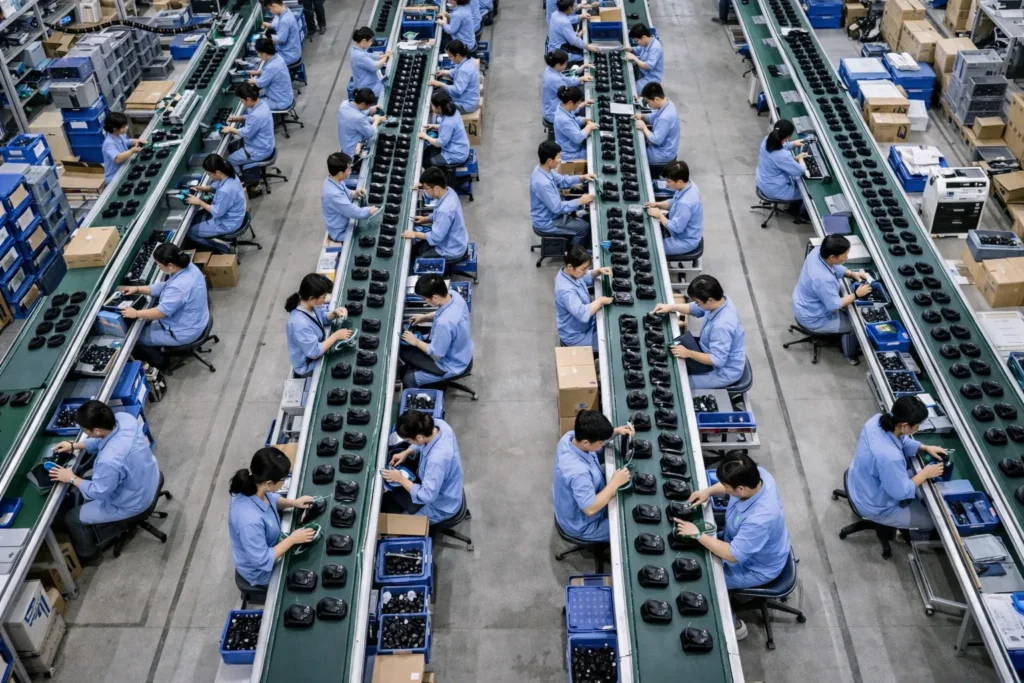
Myszy komputerowe mogą wydawać się proste, ale za każdym urządzeniem stoi zaawansowana linia produkcyjna z wieloma etapami produkcji i kontroli jakości. Dla firm pozyskiwanie myszy od dostawców OEM/ODM, zrozumienie tego przepływu pracy w fabryce ma kluczowe znaczenie. Umożliwia to lepszą komunikację z producentami i pomaga w ocenie możliwości fabryki i przestrzegania standardów. W rzeczywistości, przy milionach myszy używanych codziennie i setkach producentów na rynku, ścisła kontrola jakości i standardy są niezbędne do zapewnienia niezawodnego produktu. Nowoczesne linie produkcyjne myszy wykorzystują zaawansowane technologie i odchudzone procesy, aby wydajnie produkować duże ilości przy jednoczesnym spełnieniu norm bezpieczeństwa i wydajności. W poniższych sekcjach omówimy kompleksowy proces produkcji myszy - od surowych plastikowych granulek po gotowy, zapakowany produkt - podkreślając kluczowe kroki, sprzęt i najlepsze praktyki na każdym etapie.
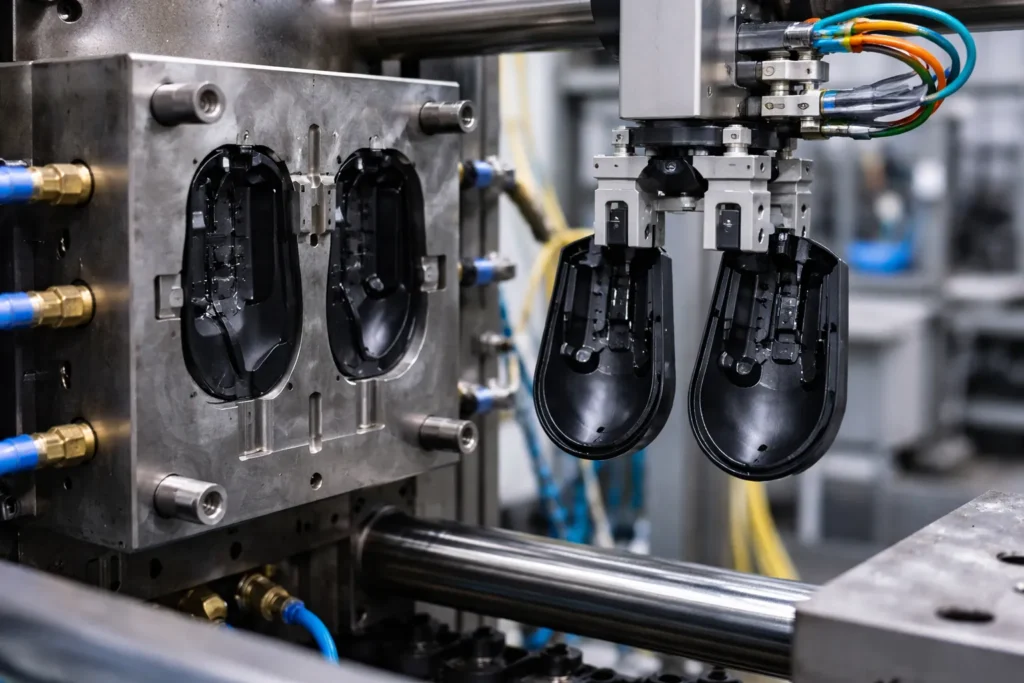
Krok 1: Formowanie wtryskowe tworzyw sztucznych (tworzenie powłoki)
Proces produkcji myszy rozpoczyna się od stworzenia jej zewnętrznej powłoki. Większość obudów myszy jest wykonana z tworzywa ABS, trwałego i dającego się formować tworzywa termoplastycznego. W obszarze formowania wtryskowego w fabryce, plastikowe granulki są topione i wtryskiwane do precyzyjnie zaprojektowanych stalowych form w kształcie górnej i dolnej połówki myszy. Tworzywo sztuczne jest podgrzewane do około 200-240 °C (400-460 °F) i wtłaczane do formy pod wysokim ciśnieniem. Proces ten zapewnia spójne, jednolite kształty dla każdej skorupy myszy. Dobrze zaprojektowana forma wielokomorowa może produkować kilka elementów skorupy w jednym cyklu, znacznie zwiększając przepustowość. Na przykład, 4-gniazdowa forma może mieć czas cyklu około 30 sekund, produkując w tym czasie cztery skorupy myszy (około 7-8 sekund na skorupę); w takiej konfiguracji koszt operacyjny maszyny wynosi tylko około $0,19 na część.
Po wstrzyknięciu tworzywo sztuczne szybko schładza się w formie, zanim maszyna wyrzuci nowo uformowane powłoki. Następnie pracownicy lub ramiona robotów usuwają części i przycinają nadmiar plastiku (np. wlewki lub wypływki). Precyzja oprzyrządowania ma kluczowe znaczenie: jakość formy bezpośrednio wpływa na jakość części. Źle utrzymana forma może powodować wady, takie jak wypływka (nadmiar cienkiego plastiku na szwie) lub niepełne wypełnienie. Dlatego fabryki wdrażają rutynową konserwację form i precyzyjną kontrolę temperatury / cyklu, aby zapewnić, że każda powłoka jest bezbłędna. Ten etap jest energochłonny (formowanie może stanowić ponad połowę zużycia energii w fabryce), ale jest zoptymalizowany pod kątem szybkości i spójności. Rezultatem jest zestaw wytrzymałych elementów z tworzywa ABS, które tworzą zewnętrzną obudowę myszy, a wszystko to wyprodukowane w ciągu kilku sekund.
Krok 2: Przycinanie powłoki i wykończenie powierzchni
Po formowaniu, surowe plastikowe obudowy są poddawane procesom przycinania i wykańczania. Po pierwsze, wszelkie pozostałości lub nadmiar materiału po formowaniu (na przykład ślady po bramie lub niewielkie zadziory) są starannie przycinane, często przy użyciu małych narzędzi tnących lub precyzyjnego oprzyrządowania do przycinania CNC. Każdy element obudowy jest następnie wizualnie sprawdzany pod kątem defektów kosmetycznych lub wypaczeń. Fabryki zazwyczaj zatrudniają inspektorów jakości, którzy sprawdzają powłoki na tym etapie, odrzucając wszelkie elementy, które wykazują ślady zatopienia, wypaczenia lub niespójne powierzchnie. Zapobiega to przekazywaniu wadliwych obudów do dalszych etapów produkcji.
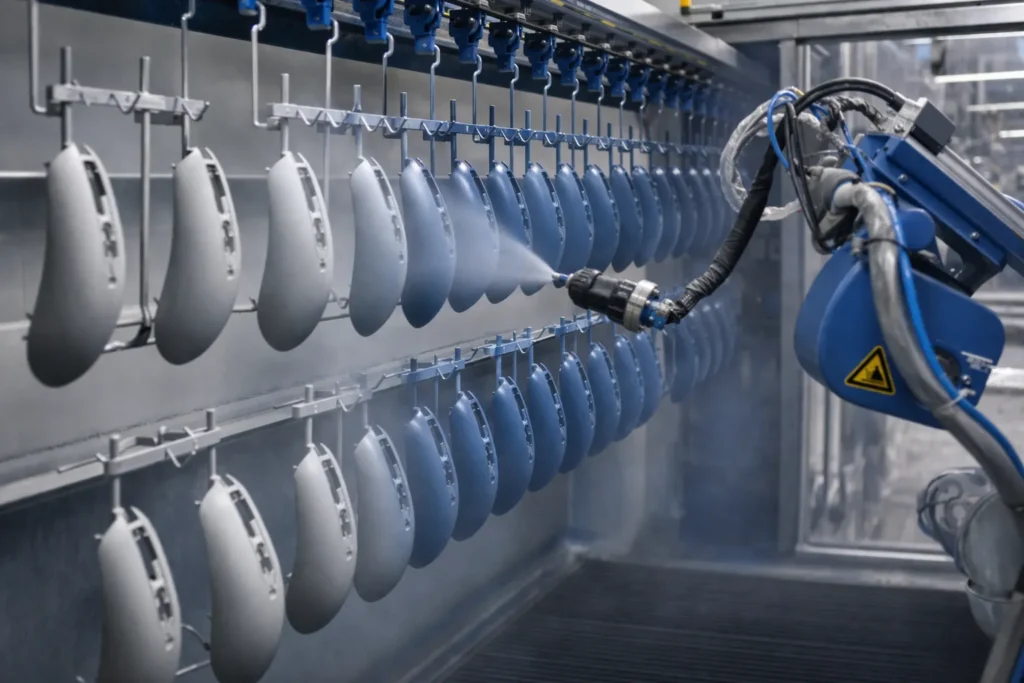
Następnie następuje wykończenie powierzchni. W zależności od wymagań produktu, powłoki myszy mogą zostać poddane dodatkowej obróbce:
- Malowanie lub powlekanie: Wiele myszy, zwłaszcza modele premium lub gamingowe, jest malowanych natryskowo lub powlekanych w celu uzyskania określonego koloru i wrażenia. W dedykowanej kabinie lakierniczej obudowy są zawieszane na stojakach lub montowane na obrotnicach, podczas gdy zautomatyzowany system malarski (lub wykwalifikowani pracownicy) nakłada warstwy farby. Niektóre powłoki obejmują podkład i trwałą powłokę kolorystyczną, a następnie ochronną powłokę bezbarwną. Do szybkiego utwardzenia farby można użyć pieców utwardzanych promieniami UV lub tuneli suszących. Dodaje to kilka minut do procesu (wykonywanego partiami), ale zapewnia błyszczące i odporne na zużycie wykończenie.
- Miękka w dotyku lub gumowana powłoka: W przypadku myszy ergonomicznych i gamingowych, gumowana farba lub miękka w dotyku powłoka może być nakładana na niektóre obszary w celu poprawy przyczepności. Wymaga to precyzyjnej aplikacji i utwardzania, aby powłoka była jednolita i trwała.
- Tekstura i logo: Jeśli powłoki nie są malowane, producenci często dodają teksturę bezpośrednio w formie (poprzez trawienie kwasem powierzchni formy), aby nadać matowy lub wzorzysty wygląd. Logotypy i symbole (takie jak logo marki lub nazwy modeli) są dodawane za pomocą tampodruku lub trawienia laserowego po formowaniu. Maszyny do tampodruku mogą stemplować tuszem logo na plastiku, podczas gdy maszyny laserowe wytrawiają oznaczenia, takie jak numery seryjne lub wskaźniki DPI z dużą precyzją.
Podczas wykańczania ważne jest utrzymanie czystego środowiska - wolne od kurzu kabiny natryskowe i odpowiednia wentylacja zapewniają, że żadne zanieczyszczenia nie brudzą farby, a pracownicy noszą odzież ochronną, aby uniknąć jakichkolwiek cząstek na skorupach. Pod koniec tego etapu zewnętrzne połówki myszy są nie tylko idealnie ukształtowane, ale także kosmetycznie gotowe, z pożądanym kolorem, teksturą i brandingiem. Każdy element jest teraz gotowy na spotkanie z wewnętrznymi komponentami podczas montażu.
Krok 3: Montaż PCB (montaż podzespołów elektronicznych)
Podczas gdy obudowy są formowane i wykańczane, równolegle przygotowywane jest elektroniczne serce myszy. Jest to etap montażu PCB, zwykle odbywający się w sekcji montażu elektroniki w fabryce (często na linii SMT, jeśli jest wykonywana we własnym zakresie, lub w dedykowanej usłudze produkcji elektroniki). Płytka drukowana myszy (PCB) to specjalnie zaprojektowana płytka, która zawiera mikrokontroler, czujnik, przełączniki i inne elementy elektroniczne, które sprawiają, że mysz działa.
Nowoczesne płytki PCB myszy są zwykle montowane przy użyciu technologii montażu powierzchniowego (SMT) w celu zapewnienia wydajności i precyzji. Oto jak to działa:
- Drukowanie pasty lutowniczej: Cienki szablon służy do nakładania pasty lutowniczej na płytkę drukowaną w precyzyjnych miejscach, w których zostaną zamontowane komponenty.
- Pick-and-Place: Sterowana komputerowo maszyna typu pick-and-place szybko umieszcza drobne elementy (rezystory, kondensatory, układy scalone, takie jak czujnik myszy i mikrokontroler itp. Maszyny te mogą umieszczać dziesiątki komponentów na sekundę z wysoką dokładnością (często w zakresie ±30-50 mikronów dla krytycznych części, takich jak czujnik). Na przykład czujnik optyczny - krytyczny element śledzący ruch - musi być umieszczony z dokładnością ±30 μm, aby prawidłowo wyrównać się z soczewką; wszelkie niewspółosiowości mogą powodować problemy ze śledzeniem, które zauważą użytkownicy. Szybkie linie SMT mogą zmontować płytkę PCB myszy w około 15-30 sekund, w zależności od złożoności, dzięki maszynom wielogłowicowym, które montują wiele części jednocześnie.
- Lutowanie rozpływowe: Po umieszczeniu, płytka przechodzi przez piec rozpływowy. Piec ten stopniowo podgrzewa płytę, topiąc pastę lutowniczą, aby trwale przylutować wszystkie elementy do montażu powierzchniowego. Bezołowiowe procesy lutownicze osiągają temperaturę szczytową około 240 °C. Profil rozpływu jest dokładnie kontrolowany (często zgodnie z wytycznymi producenta komponentów), aby zapewnić prawidłowe połączenia lutowane bez uszkadzania wrażliwych części. (W szczególności komponenty takie jak mikroprzełączniki, jeśli są typu SMT, wymagają starannych profili termicznych - nadmiar ciepła może skrócić żywotność przełącznika).
- Komponenty przelotowe: Niektóre komponenty mogą być montowane przelotowo, a nie powierzchniowo, np. Złącze USB (w przypadku myszy przewodowych) lub niektórych dużych kondensatorów lub pinów. Są one wkładane ręcznie lub przez zautomatyzowane maszyny. Lutowanie przewlekane jest często wykonywane przy użyciu maszyna do lutowania na faliSpód płytki jest przesuwany nad falą roztopionego lutowia, która lutuje wszystkie połączenia pinowe jednocześnie. Alternatywnie, lutowanie selektywne lub lutowanie ręczne jest stosowane, jeśli potrzebnych jest tylko kilka połączeń przelotowych (na przykład montaż czujnika kółka przewijania lub nagłówka pinów modułu RF do łączności bezprzewodowej).
- Czyszczenie i inspekcja: Zmontowana płytka PCB może zostać oczyszczona z pozostałości topnika, a następnie sprawdzona. Fabryki stosują na tym etapie systemy automatycznej inspekcji optycznej (AOI) - szybkie kamery, które badają każde połączenie lutowane i rozmieszczenie komponentów, aby wychwycić wszelkie nieprawidłowo ustawione lub brakujące komponenty. Dodatkowo Test w obwodzie (ICT) W przypadku produktów z wyższej półki można przeprowadzić test sondą latającą: wykorzystuje on sondy testowe do sprawdzenia, czy każdy obwód na płycie działa (upewniając się, że nie ma zwarć lutowniczych lub otwartych obwodów).
- Wstępne testy PCB: Zanim płytka drukowana opuści linię SMT, zazwyczaj przeprowadzana jest podstawowa kontrola elektroniki. Na przykład, płytka może zostać włączona, aby sprawdzić, czy mikrokontroler się uruchamia, a czujnik reaguje. Ma to na celu wczesne wychwycenie wszelkich awarii elektrycznych. Niedoskonałe płytki są odrzucane lub przerabiane na tym etapie, zanim zostaną zintegrowane z myszą, ponieważ znacznie trudniej jest naprawić lub wymienić płytkę po ostatecznym montażu.
Pod koniec montażu PCB mamy w pełni wypełnioną płytkę drukowaną - “mózg” i “układ nerwowy” myszy - gotową do połączenia z fizycznymi komponentami. W fabryce produkującej na dużą skalę, wiele linii montażowych PCB może działać równolegle, produkując tysiące takich płytek dziennie. (Dla przykładu, podstawowa linia do produkcji myszy biurowych może produkować płytkę co ~20 sekund, wykorzystując pojedynczą szybką linię SMT z AOI i podstawowymi testami). Proces ten jest wysoce zautomatyzowany, aby zapewnić spójność, zwłaszcza biorąc pod uwagę mały rozmiar i drobną podziałkę komponentów, takich jak czujniki i mikrokontrolery w nowoczesnych myszach.
Krok 4: Integracja mikroprzełącznika i czujnika
Po zapełnieniu płytki drukowanej, należy zwrócić uwagę na komponenty mechaniczne i elektromechaniczne które są krytyczne dla funkcji myszy - w szczególności przełączniki click i zespół czujnika optycznego. Na tym etapie komponenty te są integrowane z płytką lub przygotowywane jako podzespoły:
- Mikroprzełączniki przycisków: Większość myszy wykorzystuje mechaniczne mikroprzełączniki dla lewego i prawego przycisku (a czasem także dodatkowych przycisków). Przełączniki te (marek takich jak Omron, Kailh lub innych) są zaprojektowane tak, aby wytrzymać miliony kliknięć, ale są również jednym z najbardziej podatnych na awarie komponentów w całym okresie użytkowania produktu. Podczas montażu przełączniki są zwykle lutowane na płytce drukowanej (często lutowane przelotowo w celu zwiększenia wytrzymałości, ponieważ są one odporne na obciążenia fizyczne). Jeśli przełączniki nie zostały już przylutowane podczas montażu PCB (niektóre procesy SMT mogą automatycznie umieszczać niskoprofilowe przełączniki), pracownicy zainstalują je teraz. Proces lutowania jest dokładnie kontrolowany, ponieważ nadmierne ciepło może uszkodzić mechanizm sprężynowy przełącznika. Fabryki czasami używają selektywnych maszyn lutowniczych lub ręcznych przyrządów lutowniczych do mocowania przełączników, jeśli nie zostały one wcześniej przylutowane na fali. Sprawdzane jest również spójne umiejscowienie; przechylony przełącznik może powodować nierównomierne klikanie, więc do utrzymywania przełączników w prawidłowej pozycji podczas lutowania używane są uchwyty wyrównujące.
- Czujnik optyczny i soczewka: Układ czujnika optycznego jest często już umieszczony na płytce drukowanej (przez maszynę SMT), ale do działania zazwyczaj wymaga soczewki lub zespołu diod LED. Na tym stanowisku pracownik lub maszyna umieszcza niewielką soczewkę na czujniku (soczewka ta skupia obraz powierzchni na czujniku) i mocuje ją. Niektóre czujniki są dostarczane jako moduły zawierające soczewkę i diodę LED na podczerwień, które można zatrzasnąć lub przykręcić do płytki drukowanej. Również w tym przypadku kluczowe znaczenie ma wyrównanie; nawet niewielkie przesunięcie może wpłynąć na dokładność śledzenia czujnika. Producenci myszy z wyższej półki stosują procedury wyrównywania, aby zapewnić, że położenie czujnika i soczewki zapewnia prawidłową odległość odrywania i jakość śledzenia.
- Zespół kółka przewijania: Mechanizm kółka przewijania to kolejny podzespołowy element, który zazwyczaj montuje się na tym etapie. Mały enkoder obrotowy lub czujnik magnetyczny wykrywa obrót kółka. Kółko (często wykonane z tworzywa sztucznego, czasami z gumową oponą zapewniającą przyczepność) jest zamontowane na niewielkiej osi wraz z enkoderem. Zespół ten może zostać później przymocowany do płytki drukowanej (PCB) lub do górnej obudowy. Często enkoder mechaniczny (obrotowy element z wycięciami odczytywanymi przez czujnik) jest przylutowany do płytki drukowanej, a podczas końcowego montażu kółko jest w niego wpasowywane. Jeśli kółko przewijania posiada funkcję kliknięcia środkowego (naciśnięcie kółka w dół), wymaga to zastosowania dodatkowego przełącznika, który może znajdować się na płytce drukowanej lub stanowić część modułu kółka. Technicy upewniają się, że kółko obraca się swobodnie, a enkoder prawidłowo wysyła sygnały (czasami przeprowadza się szybki ręczny test obrotu lub wykorzystuje się przyrząd testowy w celu sprawdzenia, czy sygnał przewijania jest wykrywany).
Na tym etapie płytka drukowana wraz ze wszystkimi zamontowanymi na niej elementami – czujnikiem z soczewką, mikroprzełącznikami, czujnikiem kółka przewijania oraz ewentualnie przyciskami bocznymi (często są to małe przełączniki umieszczone na krawędziach płytki) – tworzy kompletny moduł elektroniki wewnętrznej. Zasadniczo “mózg” (płytka drukowana z układami scalonymi) i “zmysły” (czujnik, przełączniki) myszy są gotowe. Ten zespół zostanie wkrótce zamontowany w plastikowej obudowie. Przed przejściem do kolejnego etapu wiele fabryk przeprowadza jeszcze jedną krótką kontrolę jakości tego zmontowanego zespołu płytki drukowanej. Na przykład po zamontowaniu enkodera i przełączników mogą podłączyć płytkę do komputera i sprawdzić, czy kliknięcia przycisków są rejestrowane, a czujnik nadal działa poprawnie. Jest to analogiczne do pośredniego testu funkcjonalnego, mającego na celu upewnienie się, że dodanie tych części mechanicznych nie spowodowało żadnych problemów. O wiele łatwiej jest naprawić problem teraz (na przykład źle przylutowany przełącznik lub źle wyrównaną soczewkę czujnika) niż po złożeniu całej myszy.
Krok 5: Montaż kabli i podzespołów (wersja przewodowa a bezprzewodowa)
W miarę jak montaż wewnętrznej płytki drukowanej zbliża się do końca, na linii produkcyjnej przetwarzane są również “ogonek” myszy oraz inne podzespoły, które różnią się w zależności od tego, czy mysz jest przewodowa, czy bezprzewodowa:
- Zespół kabla USB (do myszy przewodowych): W myszy przewodowej kabel USB pełni rolę “ogona”. Kable te są często przygotowywane z wyprzedzeniem. Typowy kabel myszy składa się z ekranowanych przewodów miedzianych, zewnętrznej gumowej lub plecionej powłoki oraz formowanych odciążników na każdym końcu. Zakład może pozyskiwać gotowe kable od dostawcy lub produkować je we własnym zakresie. W obu przypadkach na tym etapie pracownicy lutują przewody kabla do płytki drukowanej (lub podłączają je za pomocą małego złącza, jeśli projekt je przewiduje). Miejsce połączenia, w którym kabel wchodzi do myszy, jest wzmocnione elementem odciążającym – często jest to formowana gumowa nakładka, która mocuje kabel do obudowy, zapobiegając jego wyrwaniu pod wpływem naprężenia. Jeden koniec tego odciążnika (element z powłoką gumową po stronie myszy) zaczepia się o obudowę myszy, a drugi koniec kabla zazwyczaj zakończony jest złączem USB z własną powłoką gumową. Linia produkcyjna zapewnia prawidłową długość i orientację kabla oraz prawidłowe podłączenie jego ekranowania (w celu uziemienia i spełnienia przepisów dotyczących zakłóceń elektromagnetycznych). W tym momencie, jeśli pociągniesz za kabel, siłę przejmie odciążka, a nie połączenia lutowane. Złącze kabla (wtyk USB typu A lub typu C) na drugim końcu jest zazwyczaj wstępnie formowane przez dostawcę kabla, ale jeśli tak nie jest, fabryka formuje je lub mocuje wraz z ewentualnym koralikiem ferrytowym służącym do tłumienia zakłóceń.
- Bateria i moduł bezprzewodowy (w myszach bezprzewodowych): W myszy bezprzewodowej, zamiast kabla, urządzenie wymaga źródła zasilania (baterii) oraz modułu radiowego. Montaż myszy bezprzewodowej często polega na włożeniu małej baterii litowo-jonowej (lub przygotowaniu styków dla baterii wymiennych) oraz zintegrowaniu modułu radiowego (RF) lub nadajnika Bluetooth. Płytka drukowana z kroku 4 może już zawierać układ scalony radia RF lub może istnieć oddzielna mała płytka pomocnicza (na przykład bezprzewodowy klucz USB w przypadku odbiornika kombinowanego lub płytka z anteną wewnętrzną). Pracownicy podłączają baterię do płytki drukowanej za pomocą złącza lub lutowania (dbając o przestrzeganie procedur dotyczących wyładowań elektrostatycznych (ESD) i bezpieczeństwa, ponieważ baterie litowo-jonowe są wrażliwe). Mogą również przymocować baterię taśmą lub użyć uchwytu, upewniając się, że nie będzie się ona przemieszczać ani nie zostanie przygnieciona po zamknięciu myszy. Elektronika bezprzewodowa wymaga dodatkowych kontroli: rozmieszczenie anteny jest ważne dla utrzymania dobrego sygnału (antena może być nadrukowana na płytce drukowanej lub stanowić niewielki przewód). Fabryka może przeprowadzić szybki test RF teraz lub później, podczas testów końcowych, w celu zweryfikowania siły połączenia bezprzewodowego. Ponadto montaż baterii litowej wiąże się z koniecznością zapewnienia zgodności z normami bezpieczeństwa transportu, takimi jak UN 38.3 (która nakłada obowiązek przeprowadzenia testów bezpieczeństwa baterii przed wysyłką) – renomowani producenci dbają o to, by ich baterie i proces montażu spełniały te normy.
- Inne podzespoły: Ten etap może również obejmować montaż wszelkich elementów dodatkowych. Na przykład, jeśli mysz posiada dodatkowe obciążniki (często spotykane w myszkach do gier w celu regulacji wagi), na linii montażowej elementy te lub wkłady zostaną umieszczone w wyznaczonych miejscach w obudowie. Jeśli obecne są ozdobne paski oświetlenia LED lub przezroczyste przewodniki światła dla bocznych diod LED/RGB, można je teraz umieścić, mocując je do płytki drukowanej lub osadzając w elementach obudowy.
Kluczowym czynnikiem, który należy tu wziąć pod uwagę, jest zróżnicowanie procesu w zależności od wariantu produktu. Myszy przewodowe a bezprzewodowe: od połowy lat 20. XX wieku myszy bezprzewodowe zyskały ogromną popularność (stanowiąc w ostatnich latach około 58% globalnej sprzedaży myszy). Oznacza to, że wiele linii produkcyjnych jest przystosowanych do montażu myszy bezprzewodowych, co obejmuje montaż baterii oraz często dodatkowy etap parowania myszy z odbiornikiem USB i testowania łączności bezprzewodowej. Natomiast montaż myszy przewodowych skupia się na wydajnym lutowaniu kabli i zabezpieczeniu przed rozciąganiem. Fabryka może posiadać oddzielne podlinie lub stanowiska dla każdego z tych typów.
Pod koniec etapu 5 wszystkie wewnętrzne elementy myszy są gotowe: płytka drukowana wraz z czujnikiem i przełącznikami jest kompletna, a do myszy podłączono kabel (w przypadku modeli przewodowych) lub zamontowano baterię i elementy bezprzewodowe (w przypadku modeli bezprzewodowych). Elementy te są teraz gotowe do umieszczenia w plastikowej obudowie myszy. Przed kontynuowaniem należy schować i zabezpieczyć wszelkie luźne przewody (czasami za pomocą odrobiny silikonu lub zacisku w obudowie), aby zapobiec ich przemieszczaniu się lub grzechotaniu. Wszystko jest przygotowane do połączenia wewnętrznej elektroniki z zewnętrzną obudową.
Krok 6: Kontrola jakości przed montażem
Przed ostatecznym montażem myszy przeprowadzana jest kluczowa kontrola jakości. W etapie 6 fabryka przeprowadza kontrole przedmontażowe wszystkich przygotowanych dotychczas komponentów i podzespołów. Etap ten ma zasadnicze znaczenie dla zapewnienia, że do montażu końcowego trafiają wyłącznie części wolne od wad, co pozwala uniknąć kosztownych przeróbek lub złomowania gotowych urządzeń. Kontrole zazwyczaj obejmują:
- Kontrola obudowy z tworzywa sztucznego: Górna i dolna część obudowy (z kroków 1 i 2) są poddawane ostatniej, dokładnej kontroli. Wykwalifikowani inspektorzy sprawdzają, czy nie ma wypaczeń, pęknięć, przebarwień, wad lakierniczych (takich jak nierównomierna powłoka lub pył w lakierze), a także upewniają się, że wszystkie słupki mocujące i gniazda śrubowe są nienaruszone. Każdy element, który nie spełnia norm estetycznych lub wymiarowych, zostaje odrzucony. Kontrola ta odbywa się zazwyczaj przy dobrym oświetleniu, a czasami z wykorzystaniem próbek referencyjnych lub przyrządów pomiarowych. Dzięki wykryciu wadliwych obudów na tym etapie fabryka unika konieczności późniejszego demontażu gotowej myszy wyłącznie z powodu kosmetycznej wady na zewnątrz.
- Testowanie urządzeń elektronicznych (montaż płytek drukowanych): Moduły PCB z etapu 4 (wraz z przełącznikami, czujnikiem itp., a także ewentualnie kablem/baterią z etapu 5) są ponownie poddawane testom elektrycznym. Może to być szybki test funkcjonalny: podłączenie płytki PCB (lub częściowo zmontowanego modułu) do zestawu testowego. W przypadku urządzenia przewodowego podłącza się kabel USB do komputera; w przypadku urządzenia bezprzewodowego można je włączyć i użyć specjalnego odbiornika do sprawdzenia jego sygnału wyjściowego. Test pozwala sprawdzić, czy czujnik wykrywa ruch, czy rejestrowane są kliknięcia, czy odbierane są sygnały z kółka przewijania oraz czy bateria lub obwód zasilający działają prawidłowo. Ponieważ urządzenie nie znajduje się jeszcze w zamkniętej obudowie, w przypadku wykrycia jakiejkolwiek usterki (np. przełącznik prawego przycisku myszy nie reaguje) stosunkowo łatwo jest teraz dokonać poprawek na płytce drukowanej lub wymienić komponent. Fabryki często stosują w tym teście prosty wskaźnik „zdał/nie zdał” – np. interfejs programowy, który świeci się na zielono, jeśli wszystkie sygnały wejściowe są wykrywane poprawnie. Niektóre wykorzystują zautomatyzowane stanowiska testowe, które mogą naciskać przełączniki, a nawet obracać kółkiem enkodera, aby symulować działania użytkownika.
- Sprawdzenie wymiarów i dopasowania: Kolejnym aspektem kontroli jakości przed montażem jest upewnienie się, że części będą do siebie prawidłowo pasować. Monterzy lub technicy ds. jakości mogą przeprowadzić próbny montaż kilku egzemplarzy, umieszczając płytkę drukowaną w obudowie, aby sprawdzić, czy otwory na śruby są wyrównane, czy poprowadzenie kabli jest prawidłowe i czy nie występują żadne kolizje. Jest to szczególnie ważne w przypadku wprowadzenia nowej partii części lub nowej wersji produktu.
Co najmniej Podczas montażu przeprowadzane są trzy etapy kontroli jakości myszy: zazwyczaj obejmuje to kontrolę elektroniczną płytki drukowanej po przylutowaniu elementów, kontrolę wizualną i mechaniczną części z tworzywa sztucznego oraz test końcowy po zakończeniu montażu. Krok 6 obejmuje te dwie pierwsze kontrole. Dzięki wprowadzeniu tych kontroli przed montażem producenci mają pewność, że gdy produkt przechodzi do kolejnego etapu, wszystkie elementy są w dobrym stanie – co znacznie zwiększa ogólną wydajność i niezawodność. Jak zauważono w przewodnikach branżowych, wczesne wykrywanie wad zapobiega “marnowaniu podzespołów elektronicznych, na przykład z powodu wadliwej obudowy”. W kontekście audytu fabryki obecność solidnego stanowiska kontroli jakości przed montażem jest pozytywnym sygnałem świadczącym o działalności zorientowanej na jakość.
Gdy komponenty przejdą ten punkt kontrolny, trafiają do kolejki oczekującej na stacje końcowego montażu. Monterzy mają teraz pewność, że części, które łączą, posłużą do stworzenia sprawnej myszy o wysokiej jakości.
Krok 7: Montaż końcowy (połączenie obudowy z elektroniką)
W kroku 7 mysz w końcu nabiera kształtu: montaż końcowy połącza plastikową obudowę z elektronicznymi elementami wewnętrznymi. Zazwyczaj odbywa się to na linii montażowej składającej się z wielu stanowisk – albo ręcznie, przez wykwalifikowanych pracowników korzystających z przyrządów i narzędzi, albo w sposób półautomatyczny, z wykorzystaniem robotycznych wkrętaków i przenośników. Sekwencja montażu standardowej myszy może wyglądać następująco:
- Zamontuj płytkę drukowaną w dolnej obudowie: Dolną połowę obudowy myszy (często jest to element zawierający podstawę, a czasami komorę na baterię lub obciążnik) umieszcza się na uchwycie. Monter pobiera przygotowaną płytkę drukowaną (z etapu 5/6) i umieszcza ją w dolnej części obudowy. W obudowie znajdują się zazwyczaj kołki ustalające lub słupki śrubowe, które pokrywają się z otworami w płytce drukowanej. Jeśli jest to mysz przewodowa, na tym etapie przewód jest przepuszczany przez otwór w obudowie (o ile nie zostało to zrobione wcześniej), a odciążka przewodu jest umieszczana w przeznaczonej do tego wnęce. Jeśli jest to mysz bezprzewodowa, bateria może już znajdować się w dolnej części obudowy lub należy ją umieścić w tym momencie. Płytkę drukowaną mocuje się do dolnej obudowy za pomocą śrub lub zatrzasków. Niektóre konstrukcje zatrzaskują się na miejscu, ale w większości przypadków do stabilnego zamocowania płytki stosuje się kilka małych śrub (aby zapobiec jej przemieszczaniu się, co mogłoby wpłynąć na wyrównanie czujnika). Pracownicy używają wkrętaków elektrycznych z regulowanym momentem obrotowym, aby nie dokręcić śrub zbyt mocno i nie pękła płytka ani tworzywo sztuczne.
- Zamontuj kółko przewijania i przyciski w górnej obudowie: Równolegle często montowany jest jeszcze jeden niewielki podzespół związany z górną obudową. Górna obudowa zawiera przyciski – zazwyczaj lewy i prawy przycisk stanowią w rzeczywistości część górnego elementu z tworzywa sztucznego, połączonego zawiasowo w pobliżu środka. Wszelkie elementy kółka przewijania, które montuje się w górnej obudowie (na przykład fizyczna oś kółka może zatrzasnąć się w górnej obudowie, łącząc się z częścią enkodera obrotowego na płytce drukowanej). Jeśli konstrukcja przewiduje oddzielny uchwyt lub wspornik dla kółka, jest on w tym momencie montowany. Niektóre myszki mają przyciski boczne, które faktycznie zatrzaskują się w górnej obudowie, a po zamknięciu łączą się z przełącznikami na płytce drukowanej. Na tym etapie pracownicy mogą umieścić wszystkie te elementy w górnej obudowie: np. wkładają kółko przewijania i upewniają się, że obraca się swobodnie, montują ewentualną małą sprężynkę do kliknięcia środkowego, jeśli jest, oraz sprawdzają, czy wypustki górnej obudowy prawidłowo stykają się z mikroprzełącznikami (poprzez szybki ręczny test “kliknięcia” na wyczucie, gdy górna obudowa jest jeszcze oddzielona).
- Połącz górną i dolną część: Teraz wstępnie zamontowaną górną obudowę łączy się z dolną obudową, w której umieszczona jest płytka drukowana. Jest to delikatny etap, podczas którego należy uważać, aby nie przygnieść żadnych przewodów (w przypadku myszy przewodowych należy upewnić się, że kabel przebiega przez odpowiedni kanał, a w przypadku myszy bezprzewodowych – że przewody baterii nie są przygniecione). Obie połówki są wyrównywane i dociskane do siebie. Zazwyczaj zatrzaskują się one, a następnie są mocowane za pomocą śrub. Większość myszy posiada kilka śrub (często ukrytych pod podkładkami spodnimi lub etykietami), które mocno łączą górną i dolną część. W fabrykach często stosuje się zautomatyzowane wkrętarki na ruchomych stanowiskach montażowych, aby dokręcać te śruby szybko i z stałym momentem obrotowym. Liczba śrub może wynosić od jednej do czterech, w zależności od konstrukcji. W miarę dokręcania śrub mysz staje się jedną solidną całością.
- Zamontuj nóżki i osłony dekoracyjne: Jeśli mysz posiada wyjmowaną ochraniacze na stopy do rolek (zazwyczaj są to podkładki teflonowe lub gumowe na spodzie, które zmniejszają tarcie); zazwyczaj nakłada się je po wkręceniu śrub (w celu zakrycia otworów po śrubach). Nóżki często mają samoprzylepną warstwę; pracownicy odklejają ją i przyklejają do wgłębień na spodzie urządzenia. Niektóre modele posiadają dodatkową płytkę ozdobną lub klapkę komory baterii, którą zatrzaskuje się na miejscu. Elementy te montuje się teraz. Na przykład spód myszy bezprzewodowej może posiadać klapkę komory baterii, którą zamyka się po sprawdzeniu, czy bateria jest na swoim miejscu.
- Pierwsze włączenie zasilania: Po całkowitym złożeniu myszy monter zazwyczaj przeprowadza na miejscu krótki test po włączeniu zasilania. Może podłączyć mysz do niewielkiego portu testowego na swoim stanowisku, aby sprawdzić, czy zapala się dioda LED lub czy komputer ją rozpoznaje. Jest to wstępna kontrola poprawności działania.
Linia montażowa jest często zorganizowana w taki sposób, że każdy pracownik wykonuje określony podzbiór tych zadań, a produkt przemieszcza się wzdłuż linii za pomocą taśmy lub zsuwnicy. Jednak część montażu myszy odbywa się również w systemie komórkowym, w którym jeden pracownik może złożyć całą mysz od początku do końca – jest to mniej powszechne w przypadku produkcji wielkoseryjnej, ale czasami stosuje się to w przypadku mniejszych partii lub bardziej złożonych produktów.
Podczas całego montażu końcowego przestrzega się zasad ochrony przed wyładowaniami elektrostatycznymi (ESD): operatorzy noszą opaski antystatyczne na nadgarstki i pracują na matach zabezpieczających przed wyładowaniami elektrostatycznymi, ponieważ płytka drukowana jest odsłonięta i zawiera wrażliwe układy scalone aż do momentu zamknięcia obudowy. Ponadto istotna jest czystość, aby uniknąć przedostania się kurzu do wnętrza myszy (zwłaszcza jeśli zawiera ona przezroczyste elementy lub czujniki).
Po zakończeniu etapu 7 mysz jest fizycznie gotowa. Po raz pierwszy wygląda jak gotowy produkt – wszystkie przyciski są na swoim miejscu, obudowa zamknięta, a elektronika umieszczona w środku. Teraz jest gotowa do kompleksowych testów, a następnie do pakowania. Ten etap montażu może zająć około 1–2 minut na sztukę na dobrze zoptymalizowanej linii (gdzie wielu pracowników zajmuje się poszczególnymi częściami procesu). Fabryki często optymalizują przepływ tak, aby wydajność tego etapu dorównywała lub przewyższała czas cyklu procesów poprzedzających. Na przykład, jeśli linia SMT produkuje płytki drukowane w tempie 2 000 sztuk dziennie, linia montażowa zostanie obsadzona personelem i zrównoważona tak, aby montować nieco więcej niż ta liczba dziennie, co pozwoli uniknąć wąskiego gardła.
Krok 8: Kompleksowe testy jakości (testy funkcjonalne i wytrzymałościowe)
Po montażu każda mysz przechodzi kompleksowe testy jakościowe, mające na celu sprawdzenie, czy działa prawidłowo i spełnia normy wydajnościowe. Ten etap ma kluczowe znaczenie dla wykrycia wszelkich problemów powstałych podczas montażu (takich jak przygnieciony kabel, nieprawidłowo ustawiony czujnik lub wadliwy element) przed zapakowaniem i wysyłką produktu. W nowoczesnych fabrykach znaczna część tych testów jest zautomatyzowana lub przynajmniej sterowana komputerowo, co zapewnia spójność i szybkość.
Testy funkcjonalne: W większości linii produkcyjnych myszy na końcu linii przeprowadza się testy funkcjonalne 100% sztuk. Mysz podłącza się do stacji testowej – w przypadku myszy przewodowych oznacza to podłączenie kabla USB do stanowiska testowego (często jest to komputer PC lub specjalistyczny komputer testowy); w przypadku myszy bezprzewodowych mysz włącza się i paruje z odbiornikiem testowym. Stacja testowa przeprowadza szybką kontrolę zgodnie z listą kontrolną:
- Śledzenie czujnika: Tester sprawdzi, czy czujnik optyczny jest w stanie śledzić ruch. Można to zrobić, ręcznie przesuwając mysz po specjalnej powierzchni i obserwując ruch kursora na ekranie. Niektóre fabryki stosują automatyczną ruchomą podkładkę lub optyczny zestaw kalibracyjny: na przykład pod myszą przesuwa się powierzchnia z wzorem lub kamera obserwuje sygnał wyjściowy czujnika. Celem jest upewnienie się, że wartość DPI i śledzenie ruchu mieszczą się w zakresie specyfikacji oraz że nie ma czujników, które nie działają.
- Kliknięcia przycisków: Każdy przycisk (lewy przycisk myszy, prawy przycisk myszy, przyciski boczne, przycisk kółka przewijania itp.) jest naciskany w celu sprawdzenia, czy działa prawidłowo. W prostszych konfiguracjach operator naciska każdy przycisk, obserwując wskaźnik w oprogramowaniu. Zaawansowane konfiguracje mogą wykorzystywać urządzenie, które automatycznie naciska każdy przycisk. Niezależnie od tego, systemy testowania automatycznego są często zaprogramowane tak, aby rejestrować reakcję każdego przełącznika, co gwarantuje, że każdy przycisk oraz ruchy kółka przewijania są rozpoznawane.
- Koła i inne cechy: Sprawdzają również, czy wykrywane są zmiany położenia kółka przewijania (zdarzenia przewijania w górę/w dół). Jeśli mysz posiada przyciski regulacji czułości (DPI) lub podświetlenie, są one również testowane (np. poprzez przełączanie między ustawieniami czułości lub sprawdzanie, czy dioda LED się zapala).
- Wydajność sieci bezprzewodowej: W przypadku urządzeń bezprzewodowych test może obejmować sprawdzenie siły sygnału lub stabilności łącza radiowego na krótkim zasięgu. Czasami wiąże się to z pomiarem mocy wyjściowej sygnału radiowego w celu upewnienia się, że spełnia ona wymogi przepisów oraz że antena jest prawidłowo podłączona.
- Diody LED i wygląd: Jeśli mysz jest wyposażona w diody LED lub podświetlenie RGB, podczas testu zostaną one włączone w celu sprawdzenia koloru i działania. Inspektor przeprowadzi również końcową kontrolę wyglądu zewnętrznego – upewniając się, że podczas łączenia połówek nie powstały żadne zadrapania ani wady montażowe.
Każda mysz, która przejdzie test, jest rejestrowana jako „zgodna”. Jeśli mysz nie przejdzie którejkolwiek części testu funkcjonalnego, jest odkładana do ponownej naprawy. Zajmie się tym niewielki zespół techników, którzy będą usuwać usterki – na przykład, jeśli prawy przycisk myszy nie działa, mogą ją rozebrać, aby sprawdzić, czy przełącznik nie jest źle ustawiony, lub wymienić przełącznik, a następnie ponownie przeprowadzić test.
Normy jakości i pobieranie próbek: Oprócz testów funkcjonalnych fabryki dbają o to, by każda mysz spełniała wymagane normy. Obejmuje to zgodność z certyfikatami, takimi jak FCC (dotyczącym emisji elektromagnetycznej) oraz oznaczeniem CE itp. Myszy muszą posiadać certyfikaty potwierdzające, że nie emitują zakłóceń przekraczających dopuszczalne limity oraz że są bezpieczne (normy bezpieczeństwa UL itp.). Certyfikaty te są zazwyczaj przyznawane na podstawie projektu i nie są sprawdzane na każdym egzemplarzu, ale fabryka dba o to, by zostały dołączone odpowiednie etykiety (co omówimy w części poświęconej opakowaniom) oraz by produkcja nie odbiegała od certyfikowanego projektu. Ponadto niektóre fabryki przeprowadzają na tym etapie kontrole wyrywkowe AQL (Acceptable Quality Level – dopuszczalny poziom jakości), w ramach których losowo wybierają egzemplarze z partii i dokładnie je sprawdzają (w tym przeprowadzają demontaż, pomiary itp.), aby statystycznie zagwarantować jakość partii.
Badania trwałości i żywotności: Chociaż nie przeprowadza się ich na każdym egzemplarzu, warto zauważyć, że renomowani producenci przeprowadzają również testy niezawodności na próbkach. Na przykład w warunkach laboratoryjnych przyciski myszy mogą być wielokrotnie naciskane miliony razy za pomocą mechanicznego siłownika w celu sprawdzenia trwałości przełączników. Mogą również przeprowadzać testy upadkowe, testy wilgotności oraz testy wytrzymałościowe ruchu myszy na egzemplarzach pobranych z partii produkcyjnych. Testy te zazwyczaj odbywają się poza główną linią produkcyjną, często w laboratorium kontroli jakości. Fakt, że niektóre fabryki firmy Logitech wykorzystują maszyny do kliknięcia przycisków 20 milionów razy, jest przykładem tak rygorystycznych testów wytrzymałościowych – nie przeprowadza się ich na każdym egzemplarzu, ale gwarantują one, że proces projektowania i produkcji pozwala uzyskać trwały produkt.
Pod koniec etapu 8 sprawdzono, czy każda mysz działa prawidłowo. Dzięki tym testom firmy takie jak Kensington mogą z całą pewnością stwierdzić, że każda mysz z ich linii produkcyjnej została podłączona i przetestowana. Taki poziom testowania znacznie ogranicza liczbę produktów DOA (uszkodzonych już w momencie dostawy) oraz zwrotów od klientów, co z kolei chroni reputację producenta i pozwala obniżyć koszty w dłuższej perspektywie (zwroty i wady mogą szybko zmniejszyć marże zysku). Nowoczesne fabryki coraz częściej wykorzystują zautomatyzowane systemy testów końcowych (czasami zintegrowane z rejestracją danych w ramach IoT) w celu wykrywania problemów, a nawet przekazywania wyników do analizy – na przykład, jeśli liczba awarii przełączników zacznie rosnąć, system to sygnalizuje, dzięki czemu inżynierowie mogą natychmiast zbadać przyczynę źródłową.
Na tym etapie każda mysz, która przeszła wszystkie testy, zostaje dopuszczona do ostatniego etapu: pakowania. Te, które nie przeszły testów, są albo naprawiane i ponownie testowane, albo wycofywane z produkcji, jeśli nie da się ich naprawić (wskaźniki odrzutów są zazwyczaj bardzo niskie, o ile poprzednie etapy były dobrze kontrolowane).
Krok 9: Pakowanie i etykietowanie do wysyłki
Ostatnim etapem linii produkcyjnej myszy jest pakowanie produktu do wysyłki. Na tym etapie myszy są już w pełni zmontowane i przetestowane, więc skupiamy się na ich bezpiecznym zapakowaniu, dołączeniu niezbędnych akcesoriów i dokumentacji dla klienta oraz oznakowaniu wszystkiego zgodnie z przepisami i wytycznymi dotyczącymi marki. Oto, co dzieje się na tym etapie:
- Etykietowanie zgodne z przepisami: Zanim mysz trafi do opakowania, zazwyczaj umieszcza się na niej wszelkie wymagane etykiety zgodności z przepisami. Na spodzie niemal każdej myszy znajduje się mała etykieta lub nadruk zawierający takie informacje, jak numer modelu, napięcie znamionowe, identyfikator FCC, znak CE, symbole recyklingu oraz nazwa producenta. Fabryki wykorzystują do tego celu wstępnie wydrukowane, trwałe etykiety (lub nadruk bezpośredni metodą tampodruku). Na przykład przepisy FCC wymagają, aby urządzenia były opatrzone etykietami identyfikacyjnymi. Etykieta ta ma charakter trwały (posiada silny klej i często jest umieszczona we wgłębieniu, dzięki czemu nie da się jej łatwo zeskrobać). Na tej stacji operator lub automatyczna maszyna nakładająca nakleja etykietę na dolną obudowę. Etykieta ta nie tylko spełnia wymogi prawne (FCC, CE, IC itp.), ale często zawiera również informacje o pozytywnym wyniku kontroli jakości lub kody datowe wydrukowane drobnym drukiem. W niektórych przypadkach, w zależności od marki, może zostać również naklejona oddzielna naklejka kontroli jakości lub hologramowa naklejka potwierdzająca autentyczność.
- Ostatnie spotkanie poświęcone akcesoriom: Zespół zajmujący się pakowaniem zbiera wszelkie dodatkowe elementy dołączone do myszy. W przypadku myszy przewodowej mogą to być jedynie ulotka z instrukcją obsługi lub karta gwarancyjna, ponieważ kabel jest już zamontowany. W przypadku myszy bezprzewodowej klucz odbiornika USB (jeśli jest to standardowa mysz RF) jest zazwyczaj umieszczony w specjalnym gnieździe w opakowaniu (lub czasami umieszczony w komorze baterii myszy). Baterie, jeśli są wyjmowane (jak baterie AA w niektórych myszkach), są dołączone — albo już włożone, albo osobno w pudełku. W tym momencie zbierane są również dyski ze sterownikami (obecnie rzadziej spotykane, bo większość myszek działa w trybie plug-and-play lub oprogramowanie można pobrać) oraz dodatkowe przyciski/uchwyty (w przypadku niektórych myszek do gier).
- Opakowanie produktu: Każda mysz jest umieszczana w opakowaniu detalicznym. Może to być zarówno proste kartonowe pudełko, jak i wyszukane plastikowe opakowanie typu blister. Wiele zamówień OEM (zwłaszcza hurtowych zamówień B2B) realizowanych jest w zwykłych kartonowych pudełkach z samą etykietą. Proces pakowania może polegać na umieszczeniu myszy w plastikowej tacki lub owinięciu jej w ochronną plastikową torebkę, a następnie włożeniu do pudełka. Jeśli jest to opakowanie detaliczne, może posiadać okienko ekspozycyjne lub klapkę, którą należy zamknąć. Fabryki dysponują urządzeniami ułatwiającymi pracownikom szybkie pakowanie produktów — na przykład utrzymującymi pudełko w pozycji otwartej, co ułatwia wkładanie produktu. Dodawane są wszelkie drukowane instrukcje obsługi lub ulotki. Na zautomatyzowanej linii maszyna może składać i kleić pudełka, ale w przypadku elektroniki proces ten często odbywa się ręcznie lub półautomatycznie ze względu na konieczność odpowiedniego ułożenia komponentów.
- Zamykanie i etykietowanie partii: Gdy wszystko znajdzie się w pudełku, pudełko zostaje zamknięte i zapieczętowane. Można to zrobić za pomocą taśmy lub naklejek samoprzylepnych albo poprzez zatrzasnięcie, jeśli jest to opakowanie typu clamshell. Pudełka detaliczne mogą być również owinięte zewnętrzną folią termokurczliwą lub opatrzone plombą zabezpieczającą przed manipulacją. Następnie na opakowaniu może zostać umieszczona etykieta zewnętrzna (na przykład etykieta z kodem kreskowym zawierająca numer seryjny produktu lub kod SKU do celów inwentaryzacyjnych). Jeśli myszki trafią do dużych sieci handlowych, każda sztuka może wymagać naklejki z kodem UPC lub naklejki z ceną detaliczną – czasami informacje te są już wydrukowane na opakowaniu, a czasami są dodawane później. Linia produkcyjna często wykorzystuje skomputeryzowany system do drukowania i nakładania tych etykiet, co gwarantuje, że do każdego egzemplarza przypisany jest właściwy numer seryjny lub numer partii.
- Opakowania zbiorcze: Poszczególne opakowania z myszami są następnie umieszczane w większych kartonach transportowych. Na przykład 50 pudełek z myszami może zmieścić się w jednym kartonie zbiorczym. Kartony te są następnie zamykane i opatrzone etykietami zawierającymi informacje o zawartości (takie jak nazwa produktu, ilość, waga brutto i miejsce przeznaczenia). Na dużą skalę zautomatyzowane maszyny do pakowania w kartony lub przenośniki mogą transportować pudełka do stanowiska paletyzacji. Jednak w wielu fabrykach myszy operatorzy ręcznie liczą i pakują myszy do kartonów, a następnie spychają je w dół w celu ułożenia na paletach.
W całym procesie pakowania zapewniona jest identyfikowalność. Często każde opakowanie produktu lub samo urządzenie posiada numer seryjny, który jest rejestrowany. Nowoczesne fabryki mogą wykorzystywać skanery i oprogramowanie do rejestrowania każdej jednostki w trakcie pakowania, powiązując ją z danymi produkcyjnymi (jest to część praktyk Przemysłu 4.0, w ramach których gromadzone są duże zbiory danych w celu usprawnienia produkcji oraz śledzenia wszelkich problemów występujących w terenie aż do konkretnej partii).
Kolejnym trendem od 2026 roku są opakowania przyjazne dla środowiska. Wiele firm decyduje się obecnie na opakowania z tektury nadające się do recyklingu, zawierające minimalną ilość tworzyw sztucznych. Według raportów branżowych około 29% marek stosuje bardziej zrównoważone i ekologiczne opakowania na myszki. Zamiast wkładek z pianki lub plastikowych opakowań typu blister można więc spotkać tacki z formowanej masy celulozowej lub po prostu kartonowe konstrukcje, w których umieszczona jest myszka. Wynika to zarówno z troski o środowisko, jak i z faktu, że konsumenci cenią sobie opakowania łatwiejsze do otwarcia.
Po zakończeniu etapu 9 produkt jest gotowy do opuszczenia fabryki. Zapakowane myszki są wysyłane do magazynu lub rampy załadunkowej, gdzie czekają na wysyłkę do dystrybutorów lub klientów. Czasami przeprowadza się końcową kontrolę jakości na próbie zapakowanych jednostek (sprawdzając, czy w pudełku znajdują się właściwe akcesoria, czy opakowanie jest schludne, czy etykiety są poprawne itp.), aby upewnić się, że wysyłany towar spełnia wymagania kupującego.
Przegląd czasu i kosztów produkcji w podziale na etapy
Aby lepiej zrozumieć powyższe etapy, w poniższej tabeli podsumowano każdy z głównych etapów linii produkcyjnej myszy wraz z przybliżonym czasem realizacji jednej sztuki oraz uwagami dotyczącymi czynników kosztowych:
| Etap produkcji | Typowy czas cyklu (na sztukę) | Najważniejsze kwestie i czynniki wpływające na koszty |
|---|---|---|
| Formowanie wtryskowe (obudowy) | ≈30–60 s na cykl (forma wielokomorowa), ~7–8 s na skorupę | Wysokie początkowe koszty form; proces wymagający dużego wykorzystania maszyn. Precyzyjna forma = mniej odpadów. Niski koszt obróbki jednej sztuki (~$0.20) dzięki wysokiej wydajności. |
| Obróbka powierzchni i powlekanie powłokami | kilka minut (przetwarzanie wsadowe) | W przypadku malowania wymaga dużego nakładu pracy i materiałów. Wymaga czasu na wyschnięcie. Zwiększa koszt jednostkowy (farba, materiały powłokowe), ale poprawia wygląd estetyczny. |
| Montaż płytek drukowanych (SMT) | 15–35 s na płytkę drukowaną (montaż SMT) | Proces zautomatyzowany; głównym kosztem są komponenty elektroniczne i płytki drukowane. Szybka linia produkcyjna oraz kontrola jakości (AOI) ograniczają konieczność poprawek. |
| Integracja przełączników i czujników | ~20–30 s (montaż na linii produkcyjnej) | Głównie praca ręczna lub drobne elementy montażowe. Kluczowe znaczenie dla jakości (wyrównanie, integralność lutów). Jakość komponentów (np. przełączniki Omron) wpływa na koszt. |
| Podłączenie kabla/akumulatora | ~15–30 s (na sztukę) | Praca związana z lutowaniem kabla lub podłączaniem akumulatora. Koszt kabla (lub koszt akumulatora w przypadku wersji bezprzewodowej) stanowi istotną pozycję w zestawieniu materiałów (BOM). Efektywne wykorzystanie przyrządów montażowych może przyspieszyć ten proces. |
| Kontrola przed montażem | ~10-20 s (na jednostkę dla testu i kontroli) | Zapewnia brak wadliwych części. Niewielki narzut czasowy na jednostkę, ale zapobiega późniejszym kosztownym przeróbkom. Inspektorzy wizualni zwiększają koszty pracy. |
| Montaż końcowy (obudowa + PCB) | ~60-120 s na jednostkę (rozłożone na pracowników) | W dużej mierze montaż ręczny. Koszty pracy zależą od lokalnych płac i równowagi linii. Pewna automatyzacja (np. śrubokręty) poprawia spójność. |
| Testy funkcjonalne | ~10-20 s na jednostkę | Zautomatyzowane stanowiska testowe zwiększają koszt początkowy, ale niski koszt jednostkowy. Zapewnia jakość - wychwycenie wady pozwala uniknąć wysyłki wadliwej jednostki (oszczędzając przyszłe koszty). |
| Opakowanie | ~15-30 s na jednostkę | Ręczne lub półautomatyczne. Materiały opakowaniowe (pudełko, wkładki) przyczyniają się do wzrostu kosztów; stosowanie opakowań zbiorczych może skrócić czas. Coraz częściej stosowane są materiały przyjazne dla środowiska (koszt może być nieco wyższy, ale często równoważony przez wartość marki). |
Uwaga: Powyższe czasy są przybliżone i zakładają zoptymalizowaną linię produkcyjną o dużej objętości. W praktyce wiele etapów często nakłada się na siebie (np. podczas gdy jeden zestaw części znajduje się we wtryskarce, inne są montowane), a kilku pracowników/maszyn pracuje równolegle. Czynniki kosztowe obejmują zarówno jednorazowe inwestycje (takie jak formy wtryskowe lub maszyny SMT), jak i koszty jednostkowe (materiały, komponenty, robocizna). Wydajna produkcja i automatyzacja (w tym monitorowanie IoT i analiza danych) pomagają skrócić czas i koszty jednostkowe przy jednoczesnym zachowaniu jakości.
Wnioski
Produkcja myszy komputerowej to złożony taniec skoordynowanych kroków - od topienia plastikowych granulek w precyzyjnie uformowane kształty, przez montaż mikroskopijnych komponentów na płytce drukowanej, po staranne połączenie elektroniki z ergonomicznie zaprojektowaną obudową. Postępując zgodnie z tym procesem krok po kroku, fabryki myszy mogą osiągnąć wysoką wydajność i stałą jakość, nawet przy ilościach rzędu dziesiątek tysięcy sztuk miesięcznie. Każdy etap produkcji jest zoptymalizowany: formowanie wtryskowe zapewnia solidną obudowę w kilka sekund, linie SMT wypełniają PCB z niesamowitą szybkością i dokładnością, a technicy montażu (często wspomagani przez przyrządy, systemy przenośników, a czasami roboty) łączą wszystko w całość, zwracając uwagę na każdy szczegół. Solidna kontrola jakości - prowadzona zgodnie z normami takimi jak UL, ISO, FCC i CE - zapewnia, że produkt końcowy nie tylko działa od razu po wyjęciu z pudełka, ale pozostanie niezawodny przez lata.
Dla menedżerów ds. zaopatrzenia i nabywców OEM/ODM zrozumienie tego przepływu pracy jest czymś więcej niż tylko ciekawostką techniczną; jest to niezbędne do oceny potencjalnych dostawców. Wycieczka po linii produkcyjnej myszy ujawnia kluczowe wskaźniki możliwości fabryki: nowoczesny zautomatyzowany sprzęt (taki jak maszyny typu pick-and-place i zautomatyzowane testery), dobrze zorganizowane stanowiska pracy z ochroną ESD, jasno określone punkty kontroli jakości oraz przestrzeganie norm bezpieczeństwa i ochrony środowiska. W 2026 r. wielu producentów myszy stosuje również techniki Przemysłu 4.0 - wykorzystując czujniki IoT i monitorowanie produkcji w czasie rzeczywistym w celu wczesnego wychwytywania problemów oraz wykorzystując analizę danych w celu ciągłego zwiększania wydajności i efektywności. Oznacza to większą przejrzystość i spójność produkcji, co przynosi korzyści nabywcom dzięki niższym wskaźnikom wad i terminowości dostaw.
Innym współczesnym trendem jest koncentracja na zrównoważonym rozwoju. Jak już wspomniano, niektórzy producenci używają obecnie tworzyw sztucznych pochodzących z recyklingu do produkcji obudów i ograniczają ilość tworzyw sztucznych w opakowaniach. To nie tylko przemawia do świadomych ekologicznie konsumentów, ale może być również wymogiem w zamówieniach (wiele firm ma obecnie cele zrównoważonego rozwoju dla swojego łańcucha dostaw). Podczas audytu fabryki można zobaczyć pojemniki do recyklingu plastikowych wlewków, energooszczędne maszyny lub certyfikaty zarządzania środowiskowego. .
Podsumowując, podróż myszy przez linię produkcyjną - od surowców do gotowego produktu w pudełku - obejmuje szereg dobrze dopracowanych etapów, z których każdy ma swoje własne niuanse techniczne i najlepsze praktyki. Omówiony przez nas podział krok po kroku pokazuje poziom precyzyjnej inżynierii i kontroli procesu, który jest niezbędny do stworzenia urządzenia, które większość użytkowników końcowych uważa za coś oczywistego. Ten wgląd umożliwia specjalistom z branży podejmowanie świadomych decyzji: niezależnie od tego, czy chodzi o wybór partnera produkcyjnego, projektowanie pod kątem możliwości produkcyjnych, czy też ulepszanie istniejącego procesu produkcyjnego. Doceniając to, jak faktycznie działają linie produkcyjne myszy, można lepiej upewnić się, że myszy zjeżdżające z tych linii spełniają pożądane standardy jakości, kosztów i wydajności - kliknięcie po kliknięciu, przewijanie po przewijaniu.
