
Computer mice may seem simple, but behind each unit is a sophisticated production line with multiple stages of manufacturing and quality checks. For businesses sourcing mouse from OEM/ODM suppliers, understanding this factory workflow is crucial. It enables better communication with manufacturers and helps in evaluating a factory’s capabilities and adherence to standards. In fact, with millions of mice used daily and hundreds of manufacturers in the market, strict quality control and standards are imperative to ensure a reliable product. Modern mouse production lines incorporate advanced technologies and lean processes to produce high volumes efficiently while meeting safety and performance standards. In the following sections, we’ll walk through the end-to-end process of how a mouse is made—from raw plastic pellets to a finished, packaged product—highlighting key steps, equipment, and best practices at each stage.
Step 1: Plastic Injection Molding (Shell Creation)
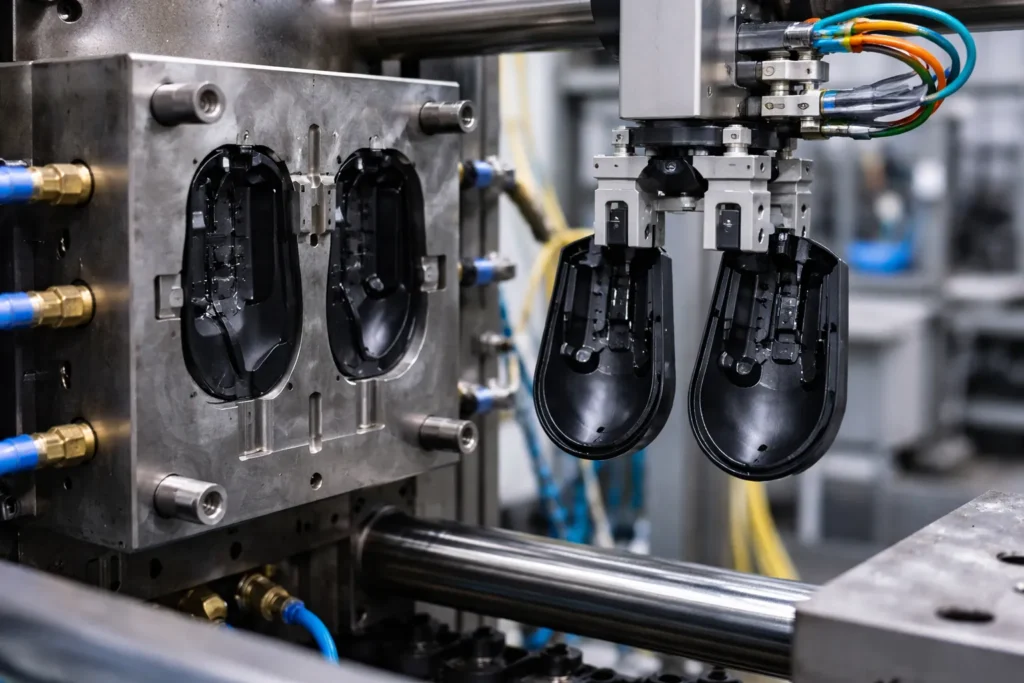
The journey of manufacturing a mouse begins with creating its outer shell. Most mouse housings are made of ABS plastic, a durable and moldable thermoplastic. In the injection molding area of the factory, plastic pellets are melted and injected into precision-engineered steel molds shaped like the mouse’s top and bottom halves. The plastic is heated to around 200–240 °C (400–460 °F) and forced into the mold under high pressure. This process yields consistent, uniform shapes for every mouse shell. A well-designed multi-cavity mold can produce several shell pieces in one cycle, greatly increasing throughput. For example, a 4-cavity mold might have a cycle time of ~30 seconds, producing four mouse shells in that time (roughly 7–8 seconds per shell); in such a setup, the machine operating cost comes out to only about $0.19 per part.
Once injected, the plastic cools quickly in the mold before the machine ejects the newly formed shells. Workers or robotic arms then remove the parts and trim off any excess plastic (such as sprues or flash). Tooling precision is critical: the quality of the mold directly affects part quality. A poorly maintained mold can cause defects like flash (excess thin plastic at the seam) or incomplete filling. Therefore, factories implement routine mold maintenance and precise temperature/cycle controls to ensure each shell is flawless. This step is energy-intensive (molding can account for more than half of a factory’s energy use), but it’s optimized for speed and consistency. The result is a set of rugged ABS plastic pieces that form the mouse’s outer body, all produced in a matter of seconds.
Step 2: Shell Trimming and Surface Finishing
After molding, the raw plastic shells undergo trimming and finishing processes. First, any leftover tabs or excess material from molding (for example, gate vestiges or slight burrs) are carefully trimmed off, often using small cutting tools or a CNC trimming fixture for precision. Each shell piece is then visually inspected for cosmetic defects or warping. Factories typically have quality inspectors check the shells at this stage, rejecting any pieces that show sink marks, warps, or inconsistent surfaces. This prevents defective housings from proceeding further down the line.
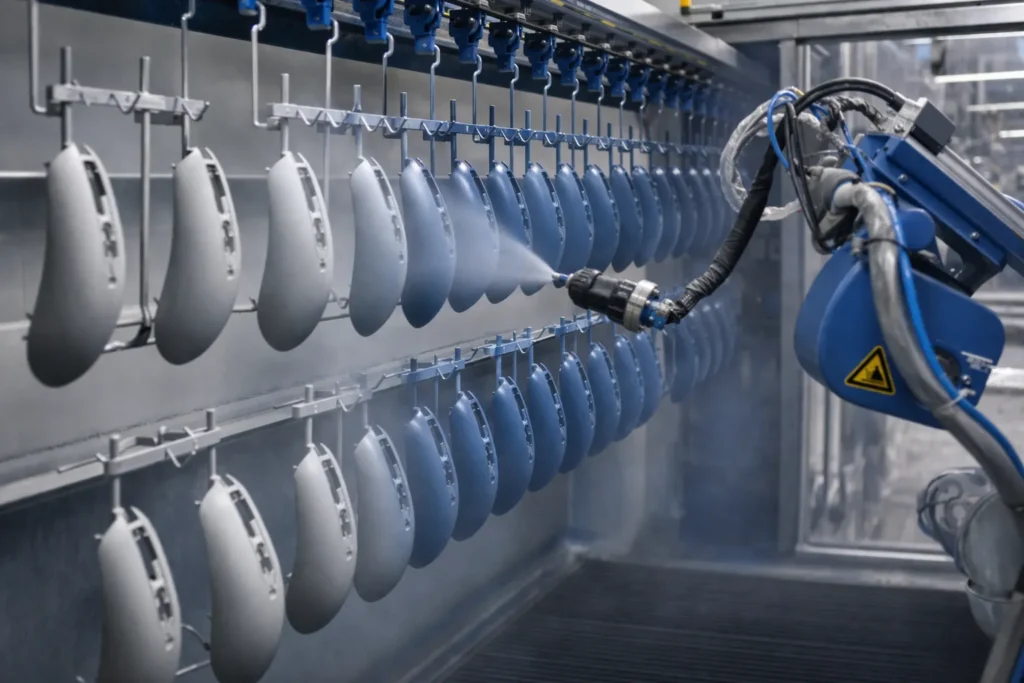
Next comes the surface finishing. Depending on the product requirements, mouse shells might receive additional treatment:
- Painting or Coating: Many mice, especially premium or gaming models, are spray-painted or coated to achieve a specific color and feel. In a dedicated spray booth, shells are hung on racks or mounted on spinners while an automated paint system (or skilled workers) applies coats of paint. Some coatings include a primer and a durable color coat, followed by a protective clear coat. UV curing ovens or drying tunnels may be used to quickly harden the paint. This adds a few minutes to the process (done in batches), but ensures a glossy and wear-resistant finish.
- Soft-touch or Rubberized Coating: For ergonomic and gaming mice, a rubberized paint or soft-touch coating may be applied to certain areas to improve grip. This requires precise application and curing so that the coating is uniform and long-lasting.
- Texture and Logos: If not painting the shells, manufacturers often add texture directly in the mold (through acid etching of the mold surface) to give a matte or patterned feel. Logos and symbols (like brand logos or model names) are added via pad printing or laser etching after molding. Pad printing machines can stamp inked logos onto the plastic, while laser machines etch markings such as serial numbers or DPI indicators with high precision.
Throughout finishing, maintaining a clean environment is important—dust-free spray booths and proper ventilation ensure no contaminants mar the paint, and workers wear protective gear to avoid any particles on the shells. By the end of this step, the mouse’s outer halves are not only perfectly shaped but also cosmetically ready, with the desired color, texture, and branding. Each piece is now ready to meet the internal components in assembly.
Step 3: PCB Assembly (Electronic Component Mounting)
While the shells are being molded and finished, the electronic heart of the mouse is prepared in parallel. This is the PCB assembly step, typically taking place in an electronics assembly section of the factory (often an SMT line if done in-house, or at a dedicated electronics manufacturing service). The mouse’s printed circuit board (PCB) is a custom-designed board that holds the microcontroller, sensor, switches, and other electronic components that make the mouse function.
Modern mouse PCBs are usually assembled using Surface Mount Technology (SMT) for efficiency and precision. Here’s how it works:
- Solder Paste Printing: A thin stencil is used to apply solder paste onto the PCB at the precise locations where components will be mounted.
- Pick-and-Place: A computer-controlled pick-and-place machine rapidly places tiny components (resistors, capacitors, IC chips like the mouse’s sensor and microcontroller, etc.) onto the board. These machines can place dozens of components per second with high accuracy (often within ±30–50 microns for critical parts like the sensor). For example, the optical sensor – the critical component that tracks movement – must be placed with ±30 μm accuracy to align properly with its lens; any misalignment can cause tracking issues that users would notice. High-speed SMT lines can assemble a mouse PCB in around 15–30 seconds of placement time, depending on complexity, thanks to multi-head machines that mount multiple parts simultaneously.
- Reflow Soldering: After placement, the board goes through a reflow oven. This oven gradually heats the board, melting the solder paste to permanently solder all surface-mount components in place. Lead-free solder processes peak around 240 °C. The reflow profile is carefully controlled (often following component manufacturer guidelines) to ensure proper solder joints without damaging sensitive parts. (Notably, components like micro-switches, if they are SMT type, require careful thermal profiles—excess heat can reduce switch lifespan.)
- Through-Hole Components: Some components might be through-hole rather than surface-mount, such as the USB connector (for wired mice) or certain large capacitors or pins. These are inserted either manually or by automated insertion machines. Through-hole soldering is often done using a wave soldering machine: the board’s underside is passed over a wave of molten solder, which solders all the pin connections at once. Alternatively, selective soldering or hand-soldering is used if only a few through-hole joints are needed (for example, mounting a scroll wheel sensor or an RF module pin header for wireless).
- Cleaning and Inspection: The assembled PCB may be cleaned of flux residues and then inspected. Factories employ Automated Optical Inspection (AOI) systems at this stage – high-speed cameras that examine each solder joint and component placement to catch any misaligned or missing components. Additionally, an In-Circuit Test (ICT) or flying probe test might be done for high-end products: this uses test probes to check that each circuit on the board is functioning (ensuring no solder shorts or open circuits).
- Initial PCB Testing: Before the PCB leaves the SMT line, a basic electronics check is typically performed. For instance, the board might be powered up to verify the microcontroller boots and the sensor responds. This is to catch any electrical failures early. Imperfect boards are rejected or reworked at this stage, before they get integrated into the mouse, because it’s much harder to fix or replace a board after final assembly.
By the end of PCB assembly, we have a fully populated circuit board—the “brain” and “nervous system” of the mouse—ready to be married with the physical components. In a high-volume factory, multiple PCB assembly lines can run in parallel, producing thousands of these boards per day. (For example, a basic office mouse line might output a board every ~20 seconds, using a single high-speed SMT line with AOI and basic testing.) The process is highly automated to ensure consistency, especially given the small size and fine pitch of components like sensors and microcontrollers on modern mice.
Step 4: Micro-Switch and Sensor Integration
With the PCB populated, attention turns to the mechanical and electromechanical components that are critical to a mouse’s function—especially the click switches and the optical sensor assembly. In this step, those components are integrated into the board or prepared as sub-assemblies:
- Button Micro-Switches: Most mice use mechanical micro-switches for the left and right click (and sometimes additional buttons). These switches (from brands like Omron, Kailh, or others) are designed to endure millions of clicks but are also one of the most failure-prone components over a product’s life. In assembly, the switches are typically soldered onto the PCB (often through-hole soldered for robustness, since they endure physical stress). If the switches were not already soldered during the PCB assembly (some SMT processes might place low-profile switches automatically), workers will install them now. The soldering process is carefully controlled because excessive heat can degrade the switch’s spring mechanism. Factories sometimes use selective soldering machines or manual soldering jigs to attach switches, if not wave-soldered earlier. Consistent placement is also checked; a tilted switch could result in an uneven click feel, so alignment fixtures are used to hold switches in the correct position as they’re soldered.
- Optical Sensor and Lens: The optical sensor chip is often already on the PCB (placed by the SMT machine), but it usually requires a lens or LED assembly to function. At this station, a worker or machine places the small lens piece onto the sensor (this lens focuses the surface image onto the sensor) and secures it. Some sensors come as modules that include the lens and IR LED, which might snap or screw onto the PCB. Alignment is critical here as well; even a slight misalignment can affect the sensor’s tracking accuracy. High-end mouse manufacturers have alignment procedures to ensure the sensor and lens positioning yields the correct lift-off distance and tracking quality.
- Scroll Wheel Assembly: The scroll wheel mechanism is another sub-component typically assembled at this stage. A small rotary encoder or magnetic sensor detects the wheel rotation. The wheel (often plastic, sometimes with a rubber tire for grip) is fitted onto a tiny axle with the encoder. This assembly might be attached to the PCB or to the top shell later on. Often, a mechanical encoder (a rotating component with notches that a sensor reads) is soldered to the PCB, and during final assembly the wheel is fitted into it. If the scroll wheel includes a middle click (pressing the wheel down), that involves another switch which might be on the PCB or part of the wheel module. Technicians ensure the wheel spins freely and the encoder signals properly (sometimes a quick manual spin test or using a test jig to verify scroll input is detected).
At this point, the PCB plus all its attached components – sensor with lens, micro-switches, scroll wheel sensor, possibly side buttons (often small switches on the PCB’s edges) – forms a complete internal electronics module. Essentially, the “brain” (PCB with chips) and the “senses” (sensor, switches) of the mouse are ready. This assembly will soon be mounted into the plastic body. Before moving on, many factories perform another brief quality check on this assembled PCB unit. For example, after attaching the encoder and switches, they might connect the PCB to a computer and verify that button clicks register and the sensor still tracks correctly. This is analogous to an intermediate functional test to ensure that adding these mechanical parts didn’t introduce any issues. It’s much easier to fix a problem now (say a mis-soldered switch or misaligned sensor lens) than after the whole mouse is put together.
Step 5: Cable and Sub-Component Assembly (Wired vs. Wireless)
As the internal PCB assembly nears completion, the production line also handles the “tail” of the mouse and other sub-components that differ depending on whether the mouse is wired or wireless:
- USB Cable Assembly (for Wired Mice): In a wired mouse, a USB cable serves as the “tail.” These cables are often prepared in advance. A typical mouse cable consists of copper wires with shielding, an outer rubber or braided jacket, and molded strain reliefs on each end. The factory might source pre-made cables from a supplier, or manufacture them in-house. In either case, at this stage workers solder the cable’s wires to the PCB (or connect via a small connector if the design uses one). The joint where the cable enters the mouse is reinforced by a strain relief – often an overmolded rubber piece that anchors the cable to the shell so it won’t pull out with tension. One end of this strain relief (the near-mouse overmold) hooks into the mouse housing, and the other end of the cable typically has a USB connector with its own overmold. The production line ensures the correct cable length and orientation, and that the cable’s shielding is properly connected (for grounding and to meet EMI regulations). At this point, if you tug on the cable, the strain relief will take the force instead of the solder joints. The cable’s connector (USB Type-A or Type-C plug) at the far end is usually pre-molded by the cable supplier, but if not, the factory will mold or attach it and any ferrite bead for noise suppression.
- Battery and Wireless Module (for Wireless Mice): In a wireless mouse, instead of a cable, the device needs a power source (battery) and a wireless radio module. Assembly of a wireless mouse often involves inserting a small Li-ion rechargeable battery (or setting up contacts for replaceable batteries) and integrating a radio frequency (RF) module or Bluetooth transmitter. The PCB from step 4 might already include the RF radio IC, or there could be a separate small daughterboard (for example, a USB wireless dongle in the case of a combo receiver, or an internal antenna board). Workers connect the battery to the PCB via a connector or solder (taking care to follow ESD and safety procedures, since Li-ion batteries are sensitive). They may also tape the battery in place or use a bracket, ensuring it doesn’t rattle or get pinched when the mouse is closed. Wireless electronics require extra checks: antenna placement is important to maintain good signal (the antenna might be printed on the PCB or a small wire). The factory may perform a quick RF test now or later in final testing to verify the wireless connection strength. Additionally, lithium battery installation triggers the need for compliance with safety transport standards like UN 38.3 (which mandates battery safety testing for shipping) – reputable manufacturers make sure their batteries and assembly process meet these standards.
- Other Sub-Components: This stage can also include assembling any secondary features. For instance, if the mouse has additional weights (common in gaming mice to adjust weight), the assembly line will insert those weight pieces or cartridges into the designated spots in the shell. If there are decorative LED lighting strips or transparent light pipes for side LEDs/RGB, those might be placed now, either attaching to the PCB or fitted into the shell pieces.
A key consideration for the line here is divergence of process depending on product variant. Wired vs Wireless: as of the mid-2020s, wireless mice have grown very popular (accounting for about 58% of global mouse shipments by recent years). This means many production lines are set up to handle wireless assembly, which includes the battery and often an extra step of pairing the mouse with its USB receiver and testing wireless connectivity. In contrast, wired mouse assembly focuses on efficient cable soldering and strain relief. A factory might have separate sub-lines or stations for each type.
By the end of Step 5, all the internal pieces of the mouse are ready: the PCB with its sensor and switches is complete, and either a cable is attached (for wired models) or a battery and wireless components are in place (for cordless models). These components are now ready to be enclosed in the mouse’s plastic body. Before proceeding, any loose wires are tucked and secured (sometimes with a dab of silicone or a clip in the shell) to prevent movement or rattling. Everything is prepared for the marriage of the internal electronics with the external shell.
Step 6: Pre-Assembly Quality Inspection
Before the final assembly of the mouse, a critical quality checkpoint takes place. At Step 6, the factory conducts pre-assembly inspections on all the components and sub-assemblies prepared so far. This step is essential to ensure that only defect-free parts move into final assembly, thereby avoiding costly rework or scrapping of finished units. The inspections typically include:
- Plastic Shell Inspection: The top and bottom shell pieces (from Steps 1 and 2) are given a last thorough check. Trained inspectors look for any warping, cracks, discoloration, paint imperfections (like uneven coating or dust in the paint), and ensure that all mounting posts and screw bosses are intact. Any piece that doesn’t meet the cosmetic or dimensional standards is rejected. This is usually done under good lighting, and sometimes with reference samples or gauges. By catching faulty shells now, the factory avoids having to dismantle a completed mouse later just because of a cosmetic flaw on the outside.
- Electronics Test (PCB Assembly): The PCB units from Step 4 (with switches, sensor, etc., and possibly cable/battery from Step 5) are tested electrically one more time. This can be a quick functional test: plugging the PCB (or the partially assembled unit) into a test harness. For a wired unit, they connect the USB to a computer; for a wireless, they might power it on and use a special receiver to check its output. The test verifies that the sensor is detecting movement, the clicks register, scroll wheel signals are received, and that the battery or power circuit is functioning. Because the unit is not yet in a closed shell, if any issue is found (say the right-click switch isn’t responding), it’s relatively easy to rework the PCB or replace a component now. Factories often use a simple pass/fail indicator for this test – e.g., a software interface that lights green if all inputs are detected correctly. Some use automated test jigs that can press the switches and even spin the encoder wheel to simulate user input.
- Dimensional & Fit Check: Another aspect of pre-assembly QA is ensuring that parts will fit together correctly. Assemblers or quality techs might do a dry-fit test of a few units by placing the PCB into a shell to confirm that screw holes align, cable routing is correct, and there are no interferences. This is especially important when a new batch of parts or a new revision is introduced.
At least three quality control steps are performed during assembly of a mouse: typically an electronics check on the PCB after component soldering, a visual/mechanical check of the plastic parts, and a final test after full assembly. Step 6 encompasses those first two checks. By enforcing these pre-assembly inspections, manufacturers ensure that when the product moves to the next stage, all ingredients are good – this significantly boosts the overall yield and reliability. As noted in industry guides, catching defects early prevents “wasting electronics due to a defective shell, for example”. In the context of auditing a factory, seeing a robust pre-assembly QC station is a positive sign of a quality-focused operation.
Once components pass this checkpoint, they are queued for the final assembly stations. Assemblers now have confidence that the parts they are putting together will result in a working, good-quality mouse.
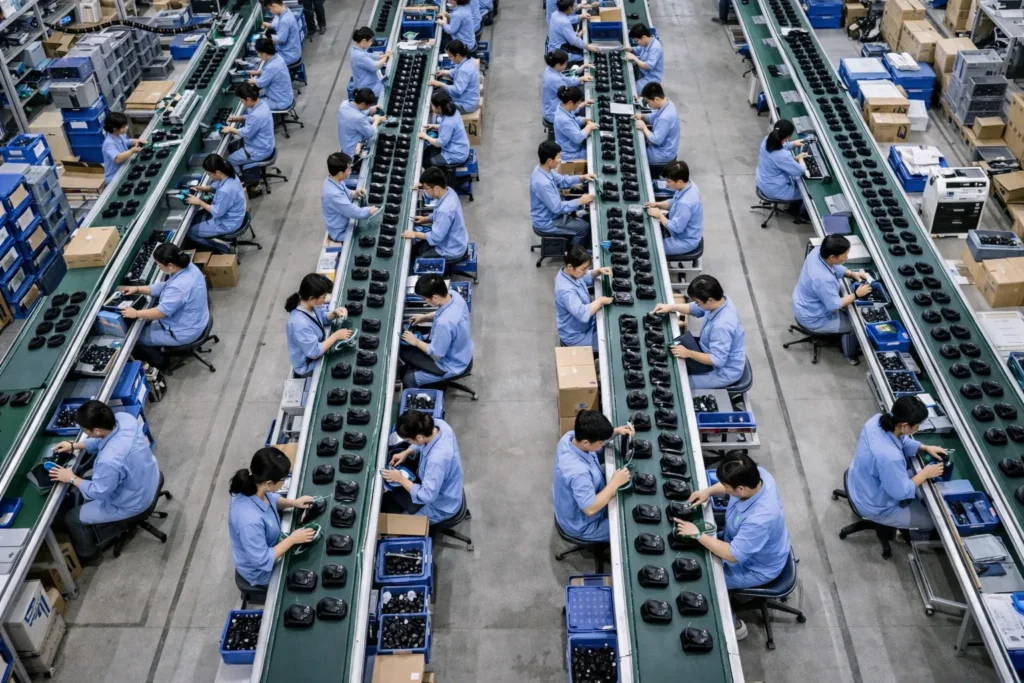
Step 7: Final Assembly (Bringing Shell and Electronics Together)
Step 7 is where the mouse finally takes shape: final assembly combines the plastic housing with the electronic innards. This typically happens on an assembly line with multiple stations, either manually by skilled workers using jigs and tools, or semi-automated with assistance from robotic screwdrivers and conveyors. The assembly sequence for a standard mouse might go as follows:
- Install PCB into Bottom Shell: The bottom half of the mouse shell (often the piece with the base and sometimes battery compartment or weight compartment) is placed on a fixture. An assembler takes the prepared PCB (from Step 5/6) and fits it into the bottom shell. There are usually locator pegs or screw posts in the shell that align with holes in the PCB. If it’s a wired mouse, the cable is threaded through an opening in the shell at this stage (if not already done) and the cable’s strain relief is seated in its recess. If it’s wireless, the battery might already be in the bottom shell or needs to be placed now. The PCB is secured to the bottom shell with screws or clips. Some designs snap in place, but most use a couple of small screws to hold the board firmly (ensuring it doesn’t move, as that could affect sensor alignment). Workers use electric screwdrivers with controlled torque so as not to overtighten and crack the board or plastic.
- Assemble Scroll Wheel & Buttons into Top Shell: In parallel, another small sub-assembly often happens with the top shell. The top shell includes the buttons – typically the left and right buttons are actually part of the top plastic, hinging near the middle. Any scroll wheel pieces that mount into the top (for instance, the physical wheel axle might snap into the top shell, with the rotary encoder portion on the PCB meeting it). If the design has a separate holder or bracket for the wheel, that is installed. Some mice have side buttons that actually clip into the top shell and then interface with switches on the PCB when closed. At this station, workers might place all these parts into the top shell: e.g. insert the scroll wheel and make sure it spins freely, attach any small spring for the middle-click if present, and verify that the top shell’s click tabs correctly contact the micro-switches (by doing a quick manual “click” feel test while the top is still separate).
- Join Top and Bottom Halves: Now the pre-fitted top shell is brought together with the bottom shell that holds the PCB. This is a delicate step to avoid pinching any wires (for wired mice, ensuring the cable runs through its channel, and for wireless, making sure the battery wires aren’t caught). The two halves are aligned and pressed together. They typically snap together and then are secured with screws. Most mice have a few screws (often hidden under the bottom pads or labels) that hold the top and bottom tight. Factories often use automated screwdrivers on dropdown rigs to fasten these screws quickly and with consistent torque. The number of screws can range from one to four, depending on the design. As the screws are driven, the mouse becomes a single solid unit.
- Attach Feet and Cosmetic Covers: If the mouse has removable skate pads/feet (usually Teflon or rubber pads on the bottom that reduce friction), these are typically applied after the screws are in (to cover the screw holes). The feet often have adhesive backing; workers peel and stick them onto recesses on the underside. Some designs have an additional cosmetic plate or battery door that is snapped on. Those are put in place now. For instance, a wireless mouse’s bottom might have a battery door that is closed after verifying the battery is in.
- Initial Power-On: With the mouse fully assembled, it’s common for the assembler to do a brief power-on test right there. They might plug the mouse into a small test port at their station to see if an LED lights up or the computer recognizes it. This is a preliminary sanity check.
The assembly line is often organized so that each worker performs a specific subset of these tasks, and the product moves down the line via a belt or slide. However, some mouse assembly is also done in a cell-based approach, where one worker might put together an entire mouse from start to finish – this is less common in high volume settings, but sometimes used for smaller batches or more complex products.
Throughout final assembly, ESD protection is observed: operators wear anti-static wrist straps and work on ESD-safe mats, because the PCB is exposed and contains sensitive ICs up until the shell is closed. Also, cleanliness is important to avoid any dust inside the mouse (especially if there are transparent parts or sensors).
By the end of Step 7, the mouse is physically complete. For the first time, it looks like the finished product – all buttons in place, shell closed up, electronics inside. It’s now ready for comprehensive testing and then packing. This assembly step might take on the order of 1–2 minutes per unit in a well-optimized line (with multiple workers each handling part of the process). Factories often optimize the flow so that the output of this stage matches or exceeds the cycle time of upstream processes. For example, if the SMT line is producing PCBs at 2,000 units per day, the assembly line will be staffed and balanced to assemble slightly more than that per day to ensure no bottleneck.
Step 8: Comprehensive Quality Testing (Functional & Durability Tests)
After assembly, every mouse goes through comprehensive quality testing to verify it works correctly and meets performance standards. This step is critical for catching any issues from the assembly process (like a pinched cable, misaligned sensor, or faulty component) before the product is packaged and shipped. In modern factories, much of this testing is automated or at least guided by computer to ensure consistency and speed.
Functional Testing: In most mouse production lines, 100% of units are functionally tested at the end of the line. The mouse is connected to a test station – for wired mice, this means plugging the USB into a test rig (often a PC or specialized test computer); for wireless, the mouse is switched on and paired with a test receiver. The test station runs through a quick checklist:
- Sensor Tracking: The tester will verify that the optical sensor can track movement. This can be done by manually moving the mouse on a special surface and checking cursor movement on screen. Some factories use an automated moving pad or optical calibration rig: for instance, a patterned surface moves underneath the mouse or a camera looks at the sensor output. The goal is to ensure the DPI and tracking are within spec and there are no dead sensors.
- Button Clicks: Each button (left click, right click, side buttons, scroll click, etc.) is pressed to confirm it registers correctly. In simpler setups, an operator will click each button while watching a software indicator. Advanced setups might have a fixture that robotically presses each button. Regardless, automated testing systems are often programmed to log each switch’s response, ensuring that every button and the scroll input are recognized.
- Wheel and Other Features: They also confirm the scroll wheel increments are detected (scroll up/down events). If the mouse has DPI adjustment buttons or lighting, those are tested too (e.g., cycling through DPI settings or seeing if the LED lights up).
- Wireless Performance: For wireless units, the test may include checking signal strength or that the RF link is stable at a short range. This sometimes involves measuring the RF output to ensure it meets regulations and that the antenna is connected properly.
- LEDs and Appearance: If the mouse has indicator LEDs or RGB lighting, the test will turn them on to check color and function. An inspector will also do a final cosmetic scan – making sure no scratches or assembly blemishes occurred when putting the halves together.
Each mouse that passes gets logged as passed. If a mouse fails any part of the functional test, it is set aside for rework. There will be a small team of technicians who troubleshoot failures – for example, if a mouse’s right button isn’t working, they might open it up to see if the switch is misaligned or replace the switch, then re-test.
Quality Standards and Sampling: Aside from functional tests, factories ensure each mouse meets required standards. This includes compliance with certifications like FCC (for electromagnetic emissions) and CE marking, etc. Mice must be certified not to emit interference beyond allowed limits and to be safe (UL safety standards, etc.). These certifications are typically handled by design and not tested on each unit, but the factory will ensure proper labels are attached (as we’ll cover in packaging) and that the production doesn’t deviate from the certified design. Additionally, some factories perform AQL (Acceptable Quality Level) sampling inspections at this stage, where they randomly pick units from the batch and inspect them thoroughly (including tear-down inspections, measurements, etc.) to statistically ensure the batch quality.
Durability and Life Testing: While not done on each unit, it’s worth noting that reputable manufacturers also conduct reliability tests on samples. For instance, a lab setup might repeatedly click the mouse buttons millions of times using a mechanical actuator to validate switch longevity. They might also perform drop tests, humidity tests, and mouse movement endurance tests on sample units from production runs. These are typically separate from the main production line, often in a quality assurance lab. The fact that some Logitech factories use machines to click buttons 20 million times is an example of such rigorous testing for durability – this isn’t done on every unit, but it ensures the design and production process yield a durable product.
By the end of Step 8, each mouse has been verified to work correctly. Thanks to these tests, companies like Kensington have confidence to claim that every single mouse off their line has been plugged in and tested. This level of testing greatly reduces DOA (dead on arrival) products and customer returns, which in turn protects the manufacturer’s reputation and saves cost in the long run (returns and defects can quickly erode profit margins). Modern factories increasingly use automated end-of-line test systems (sometimes integrated with IoT data logging) to catch issues and even feed results into analytics – for example, if switch failures start trending up, the system flags it so engineers can investigate the root cause immediately.
At this stage, any mouse that has passed all tests is cleared for the final step: packaging. Those that failed are either fixed and re-tested or scrapped if unrepairable (scrap rates are usually very low if prior steps were well-controlled).
Step 9: Packaging and Labeling for Shipping
The final step in the mouse production line is to package the product for shipment. At this point, the mice are fully assembled and tested, so the focus is on packing them safely, providing the customer with necessary accessories/documentation, and labeling everything according to regulations and branding. Here’s what happens in this stage:
- Regulatory Labeling: Before a mouse is boxed, it typically receives any required regulatory labels. On the underside of almost every mouse, you’ll find a small label or printing with information like the model number, rated voltage, FCC ID, CE mark, recycling symbols, and the manufacturer’s name. Factories use pre-printed durable labels (or direct pad printing) for this. For example, FCC regulations require that devices bear identification labels. The label is designed to be permanent (strong adhesive and often placed in a recess so it’s not easily scratched off). At this station, an operator or automatic applicator machine pastes the label onto the bottom shell. This label not only meets legal requirements (FCC, CE, IC, etc.), but also often includes QC pass info or date codes in tiny print. In some cases, a separate QC sticker or an authenticity hologram sticker might be applied too, depending on the brand.
- Final Accessories Gathering: The packaging team gathers any additional items that go with the mouse. For a wired mouse, this might just be an instruction pamphlet or warranty card since the cable is attached. For a wireless mouse, the USB receiver dongle (if it’s a standard RF mouse) is usually inserted into a specific slot in the package (or sometimes it’s docked in the mouse’s battery compartment). Batteries, if they are removable (like AA batteries for some mice), are included—either pre-installed or separately in the box. Any driver disk (less common nowadays as most mice are plug-and-play or download software) or extra buttons/grips (for some gaming mice) are also collected at this point.
- Product Boxing: Each mouse is placed in its retail packaging. This can vary from simple cardboard boxes to elaborate display plastic blister packs. Many OEM orders (especially B2B bulk orders) use plain cardboard boxes with just a label. The packaging process might involve inserting the mouse into a plastic tray or wrapping it in a protective plastic bag, then into the box. If it’s a retail package, there might be a display window or clamshell that needs sealing. Factories have fixtures to help workers box items quickly—like holding a box open for easy insertion. Any printed manuals or inserts are added. In an automated line, a machine might fold and glue boxes, but often for electronics, it’s manual or semi-automated due to the need to arrange components properly.
- Sealing and Batch Labeling: Once everything is in the box, the box is closed and sealed. This could be with tape or adhesive dots, or by snapping shut if it’s a clamshell. Retail boxes might also get an outer shrink-wrap or tamper-evident seal. Next, the box might get an external label (for example, a barcode label with the product serial number or SKU for inventory). If the mice are going to big retailers, each unit could need a UPC code sticker or retail price sticker – sometimes the printing on the box includes that, other times it’s added. The production line often uses a computerized system to print and apply these labels, ensuring the right serial or lot number is associated with each unit.
- Bulk Packaging: The individual boxed units are then placed into larger shipping cartons. For instance, 50 mice boxes might go into a master carton. These cartons are then sealed and labeled with content details (like product name, quantity, gross weight, and destination). On a large scale, automated carton packing machines or conveyors might carry boxes to palletization. But in many mouse factories, operators do the counting and packing into cartons by hand, then push them down for pallet stacking.
Throughout packaging, traceability is maintained. Often each product box or the device itself has a serial number that is recorded. Modern factories may use scanners and software to log each unit as it’s packed, tying it to production data (this is part of Industry 4.0 practices where big data is collected to improve production and track any field issues back to a batch).
Another trend as of 2026 is eco-friendly packaging. Many companies now opt for recyclable cardboard packaging with minimal plastics. According to industry reports, roughly 29% of brands use more sustainable, eco-friendly packaging for mice. So instead of foam inserts or plastic blister packs, you might see molded pulp trays or just cardboard structures holding the mouse. This is both for environmental reasons and because consumers appreciate easier-to-open packaging.
At the end of Step 9, the product is ready to leave the factory. Packed mice are sent to the warehouse or loading dock, where they await shipment to distributors or customers. A final quality audit is sometimes performed on a sample of packaged units (checking if the right accessories are in the box, packaging is neat, labels correct, etc.), ensuring that what goes out meets the buyer’s specifications.
Production Time and Cost Overview by Step
To put the above steps into perspective, the table below summarizes each major step in the mouse production line along with an approximate per-unit time and notes on cost factors:
| Production Step | Typical Cycle Time (per unit) | Key Considerations and Cost Factors |
|---|---|---|
| Injection Molding (Shells) | ≈30–60 s per cycle (multi-cavity mold), ~7–8 s per shell | High upfront mold cost; machine-intensive. Precision mold = less scrap. Per-part machine cost low (~$0.20) due to high throughput. |
| Shell Finishing & Coating | a few minutes (batch process) | Labor/material intensive if painted. Requires drying time. Adds to unit cost (paint, coating materials) but improves aesthetics. |
| PCB Assembly (SMT) | 15–35 s per PCB (SMT placement) | Automated process; major cost is electronic components and PCB. High-speed line and quality control (AOI) reduce rework. |
| Switch & Sensor Integration | ~20–30 s (in-line assembly) | Mainly labor or small fixtures. Critical for quality (alignment, solder integrity). Component quality (e.g., Omron switches) impacts cost. |
| Cable/Battery Attachment | ~15–30 s (per unit) | Labor to solder cable or connect battery. Cable cost (or battery cost for wireless) is a significant BOM item. Efficient jig use can speed this up. |
| Pre-assembly Inspection | ~10–20 s (per unit for test & inspect) | Ensures no defective parts proceed. Minor time overhead per unit, but prevents costly rework later. Visual inspectors add to labor cost. |
| Final Assembly (Shell + PCB) | ~60–120 s per unit (distributed across workers) | Largely manual assembly. Labor cost here depends on local wages and line balance. Some automation (e.g., screwdrivers) improves consistency. |
| Teste funcional | ~10–20 s per unit | Automated test rigs add initial cost but low per-unit cost. Ensures quality – catching a defect here avoids shipping a faulty unit (saving future cost). |
| Embalagem | ~15–30 s per unit | Manual or semi-auto. Packaging materials (box, inserts) contribute to cost; using bulk packing can reduce time. Eco-friendly materials increasingly used (cost can be slightly higher but often offset by brand value). |
Observação: The times above are approximate and assume an optimized high-volume production line. In practice, multiple steps often overlap (e.g., while one set of parts is in the injection machine, others are being assembled), and several workers/machines work in parallel. Cost factors include both one-time investments (like injection molds or SMT machines) and per-unit costs (materials, components, labor). Efficient production and automation (including IoT monitoring and data analytics) help drive down the per-unit time and cost while maintaining quality.
Conclusão
Manufacturing a computer mouse is a complex dance of coordinated steps – from melting plastic pellets into precisely molded shapes, to mounting microscopic components on a PCB, to carefully marrying electronics with ergonomically designed shells. By following this step-by-step process, mouse factories can achieve high efficiency and consistent quality, even at volumes of tens of thousands of units per month. Each stage of production is optimized: injection molding provides a sturdy chassis in seconds, SMT lines populate PCBs with incredible speed and accuracy, and assembly technicians (often assisted by jigs, conveyor systems, and occasionally robots) bring everything together with an eye on every detail. Throughout, robust quality control – guided by standards like UL, ISO, FCC, and CE – ensures that the final product not only works out of the box but will remain reliable for years.
For sourcing managers and OEM/ODM buyers, understanding this workflow is more than just technical curiosity; it’s essential for evaluating potential suppliers. A tour of a mouse production line reveals key indicators of a factory’s capability: modern automated equipment (like pick-and-place machines and automated testers), well-organized workstations with ESD protection, clearly defined QC checkpoints, and adherence to safety and environmental standards. In 2026, many mouse manufacturers are also embracing Industry 4.0 techniques – using IoT sensors and real-time production monitoring to catch issues early and employing data analytics to continuously improve yield and efficiency. This means greater transparency and consistency in production, which benefits buyers through lower defect rates and on-time delivery.
Another contemporary trend is the focus on sustainability. As noted, some producers now use recycled plastics for shells and reduce plastics in packaging. This not only appeals to eco-conscious consumers but can also be a requirement in procurement (many companies now have sustainability goals for their supply chain). When auditing a factory, one might see bins for recycling plastic sprues, energy-efficient machines, or certificates for environmental management .
In summary, the journey of a mouse through the production line – from raw materials to a finished product in a box – involves a series of well-honed steps, each with its own technical nuances and best practices. The step-by-step breakdown we’ve covered demonstrates the level of precision engineering and process control that goes into making a device most end-users take for granted. This insight enables industry professionals to make informed decisions: whether it’s choosing a manufacturing partner, designing for manufacturability, or improving an existing production process. By appreciating how mouse production lines actually work, one can better ensure that the mice rolling off those lines meet the desired benchmarks for quality, cost, and performance – click after click, scroll after scroll.
