
Was die Menschen wirklich wissen wollen
Wenn jemand nach der Frage sucht, wie man ein Mauspad selbst herstellt, möchte er vielleicht ein einfaches Heimwerkerprojekt.
Aber viele Käufer erkunden auch, wie individuelle Mauspads werden vor der Kontaktaufnahme mit einer Fabrik, der Einführung einer Marke oder der Bestellung von Werbeartikeln vorgenommen.
Die tatsächliche Suchabsicht lässt sich in der Regel in vier Gruppen einteilen:
| Intention der Suche | Was der Leser will |
|---|---|
| DIY-Anwender | Ein Mauspad zu Hause anfertigen |
| Designer | Druckvorlagen auf einem brauchbaren Tampon |
| Eigentümer der Marke | Verstehen, wie kundenspezifische Pads hergestellt werden |
| Käufer | Vergleich der DIY-Qualität mit der Fabrikproduktion |
| Beschaffungsmanager | Vorbereiten von Spezifikationen für Muster und Großaufträge |
Ein selbstgemachtes Mauspad kann ganz einfach sein.
Ein werkseitig hergestelltes Mauspad muss die Oberflächenbeschaffenheit, die Griffigkeit der Unterlage, die Haltbarkeit des Drucks, die Ebenheit, die Größentoleranz und die Verpackungskonsistenz kontrollieren.
Woraus besteht ein Mauspad?
Die meisten weichen Mauspads haben einen mehrschichtigen Aufbau: eine Oberseite aus Stoff, eine Klebeschicht und eine Unterseite aus Gummi oder Schaumstoff.
SteelSeries beschreibt seine QcK-Pads mit mikrogewobenem Stoff und einer rutschfesten Gummibasis. Die QcK-Linie soll bereits über 15 Millionen Mal verkauft worden sein.
Razer beschreibt die Goliathus Chroma mit einer mikro-texturierten Stoffoberfläche für Geschwindigkeit und Kontrolle.
Diese Beispiele zeigen, warum die Auswahl der Oberfläche und des Untergrunds wichtig ist.
Ein gutes Mauspad ist nicht nur ein bedrucktes Rechteck, sondern auch eine kontrollierte Oberfläche.
| Ebene | Allgemeines Material | Zweck |
|---|---|---|
| Oberfläche | Polyestergewebe, Mikrofaser, Lycra, Webstoff | Steuert Gleiten und Spurhaltung |
| Klebeschicht | Heißkleber oder Laminierfolie | Hält die Schichten zusammen |
| Basis | Naturkautschuk, SBR-Kautschuk, PU-Schaum, Poron-Style-Schaum | Bietet Grip und Dämpfung |
| Kante | Rohschnitt oder genähte Kante | Verhindert das Ausfransen |
| Verpackung | Beutel, Hülse, Schachtel, Schlauch | Schützt Form und Oberfläche |
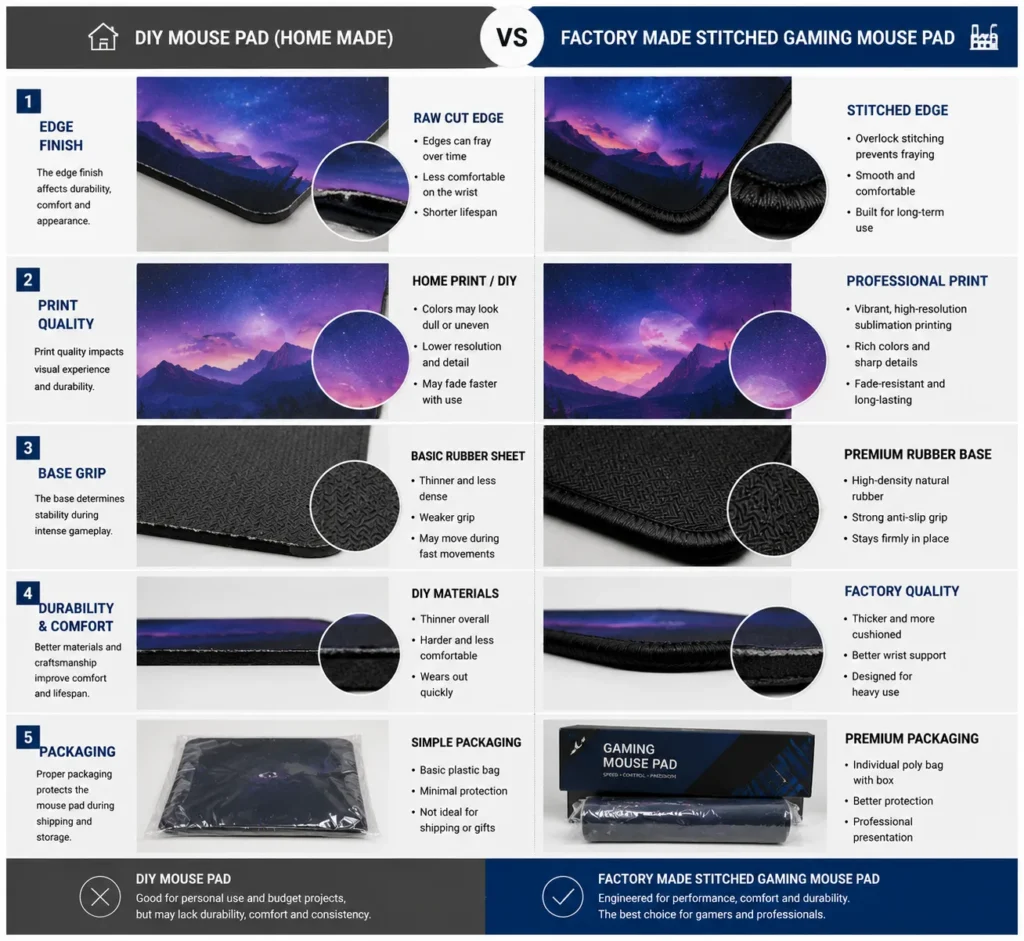
DIY-Methode vs. Fabrikmethode
Mit Stoff, einer Gummiplatte, Klebstoff und einem Schneidewerkzeug können Sie Ihr eigenes Mauspad zu Hause herstellen.
Die Fabrikproduktion bietet jedoch eine bessere Konsistenz, da jeder Schritt gemessen wird.
| Artikel | DIY-Mauspad | Fabrik-Mauspad |
|---|---|---|
| Oberfläche | Stoff oder bedruckter Stoff | Geprüfte Gewebeoberfläche |
| Basis | Gummiplatten, Schaumstoffplatten, Kork | Gummi, SBR, PU-Schaum, Poron-Style-Schaum |
| Bindung | Sprühkleber oder Kontaktkleber | Heißlaminierung oder Industriekleber |
| Schneiden | Schere oder Bastelmesser | Stanzen, CNC-Schneiden, Laserschneiden |
| Kante | Normalerweise rohe Kante | Rohe, genähte oder unauffällige Nähte |
| Qualität | Hängt von der Handarbeit ab | QC-Prüfung auf Chargenebene |
Heimwerken ist gut zum Lernen.
Die Fabrikproduktion ist besser für den Einzelhandel, das Branding, den Spielbetrieb und Nachbestellungen.
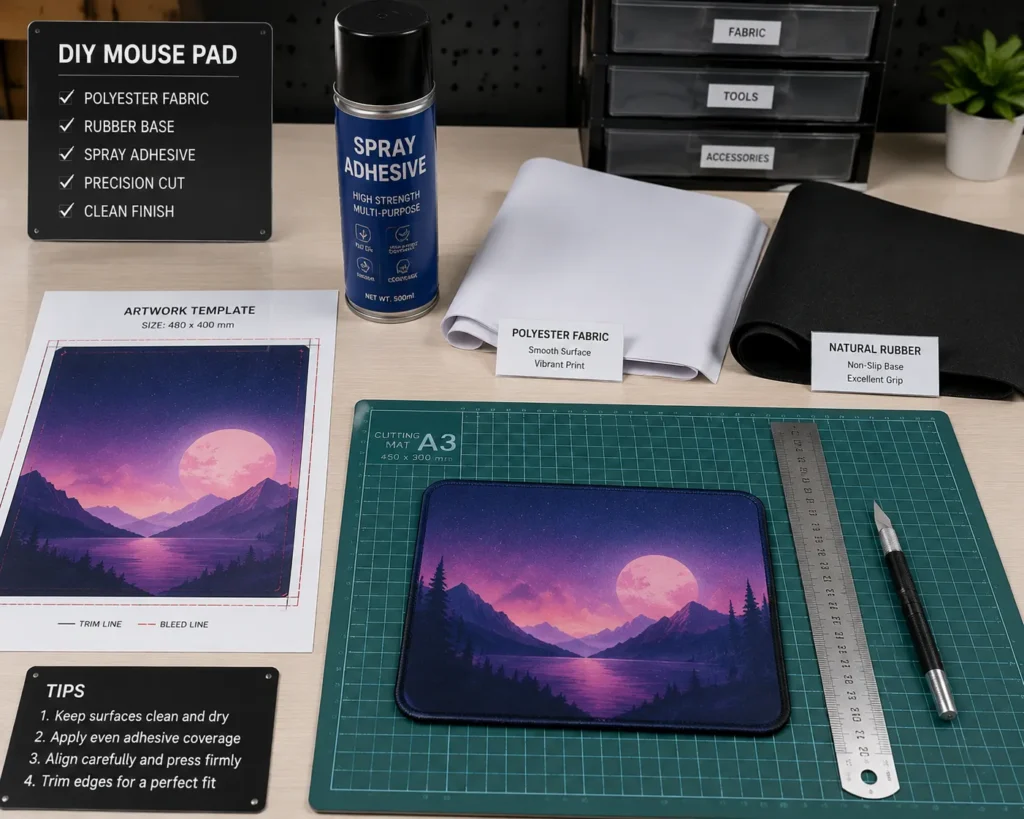
Materialien, die Sie für die Herstellung eines eigenen Mauspads benötigen
Für ein einfaches Mauspad zum Selbermachen benötigen Sie eine Oberseite, eine Unterlage, Klebstoff und Schneidewerkzeuge.
Für einen Profi benutzerdefiniertes Mauspad, gilt die gleiche Logik, aber die Materialien müssen für die Produktion geeignet sein.
| Material | DIY-Option | Werkseitige Option |
|---|---|---|
| Obere Oberfläche | Polyestergewebe, bedruckter Stoff | Mikrogewebter Stoff, Kontrollgewebe, Lycra |
| Basis | Gummiplatten, Schaumstoffplatten | Naturkautschuk, SBR, PU-Schaum |
| Kleber | Sprühkleber | Heißlaminierbarer Klebstoff |
| Schneiden | Cutter, Lineal, Matte | Stahlstempel oder CNC-Fräser |
| Kantenbearbeitung | Rohschnitt | Abgenähte Kante oder unter der Oberfläche liegende Nähte |
Zum Bedrucken wird Polyestergewebe bevorzugt, da sich Sublimationsfarben unter Hitzeeinwirkung am besten mit Polyesterfasern verbinden.
Aus diesem Grund werden für viele individuell bedruckte Mauspads Polyestergewebe und nicht Baumwolle verwendet.
Schritt 1: Auswahl des Oberflächenmaterials
Die Oberfläche ist der wichtigste Teil der Benutzererfahrung.
Sie beeinflusst Geschwindigkeit, Kontrolle, Bremskraft und Handgefühl.
| Oberfläche Typ | Gefühl | Am besten für |
|---|---|---|
| Glattes Polyester | Ausgewogen und wirtschaftlich | Heimwerker- und Bürounterlagen |
| Mikrogewebter Stoff | Konsistente Verfolgung | Pads für Spiele und Einzelhandel |
| Grob gewebter Stoff | Mehr Reibung und Kontrolle | FPS Steuerkreuz |
| Lycra | Schnell und geschmeidig | Gaming-Pads im Speed-Stil |
| PU-Leder | Hochwertiger Bürolook | Geschenke für Unternehmen |
| Hartplastik oder Glas | Sehr schnell | Spezialisierte Spielepads |
Für den Heimwerkerbereich ist das glatte Polyestertuch praktisch.
Für die Produktion in der Fabrik sollten Käufer Stoffmuster anfordern, da zwei Stoffe ähnlich aussehen, aber unterschiedlich funktionieren können.
Schritt 2: Wählen Sie die Basis
Die Unterlage entscheidet darüber, ob das Mauspad flach bleibt und auf dem Schreibtisch Halt findet.
Eine schwache Unterlage wird rutschen, sich wölben oder verformen.
Rogers beschreibt PORON Polyurethanschaumstoffe haben eine ausgezeichnete Druckverformungsresistenz, die die langfristige Leistung in Polsteranwendungen unterstützt.
Aus diesem Grund wird bei hochwertigen Mauspads mit weicher Unterlage häufig Schaumstoff vom Typ Poron verwendet.
| Grundmaterial | Vorteil | Begrenzung |
|---|---|---|
| Naturkautschuk | Starke Griffigkeit und Elastizität | Kann Geruch haben |
| SBR-Kautschuk | Kostengünstig und stabil | Weniger hochwertiges Gefühl |
| PU-Schaum | Weich und leicht | Erforderliche Dichtekontrolle |
| Poron-Style-Schaumstoff | Gute Zug- und Druckrückfederung | Höhere Kosten |
| Kork | DIY-freundlich | Geringere Spielleistung |
Für Heimwerker ist eine Gummiplatte am einfachsten.
Für die Fabrikproduktion, Naturkautschuk und SBR-Gummi sind bei Standardpolstern üblich, während PU- und Poron-Schaum für Premium-Modelle verwendet werden.
Schritt 3: Bereiten Sie das Bildmaterial vor
Wenn Sie ein bedrucktes Mauspad wünschen, bereiten Sie die Vorlage vor dem Schneiden vor.
Die Vorlage sollte größer sein als das Endformat, da beim Schneiden der äußere Rand entfernt wird.
Werksvorlagenstandards:
| Artikel | Empfohlener Standard |
|---|---|
| Auflösung | 300 DPI |
| Farbmodus | CMYK- oder Pantone-Referenz |
| Beschnittbereich | 3-5 mm |
| Dateityp | AI, PDF, PSD, TIFF, PNG |
| Platzierung des Textes | Abseits von Kante und Naht |
| Position des Logos | Bestätigen Sie mit der Vorlage für die endgültige Größe |
Für einen DIY-Tampon können Sie den Stoff zu Hause bedrucken oder einen Stoffdruckdienst beauftragen.
Bei der Produktion im Werk sollte die Druckdatei vor der Bemusterung geprüft werden, um unscharfe Logos oder abgeschnittene Druckvorlagen zu vermeiden.
Schritt 4: Bedrucken der Oberfläche
Das gängigste werkseitige Druckverfahren für Stoffmauspads ist die Farbstoffsublimation.
Bei der Sublimation wird der Farbstoff durch Hitze in die Polyesterfasern übertragen, wodurch die Oberfläche glatt bleibt, anstatt eine dicke Farbschicht aufzutragen.
Das ist wichtig, denn Mauspads müssen stabil gleiten.
Eine erhöhte Farbschicht kann die Oberflächenreibung verändern.
| Druckverfahren | Am besten für | Werksnotiz |
|---|---|---|
| Farbstoffsublimation | Vollfarbige Stoffpads | Weiches Gefühl, lebendiges Design |
| Siebdruck | Einfache Logos | Gut für große Aufträge mit wenig Farbe |
| UV-Druck | Harte Polster oder PU-Leder | Funktioniert auf starren Oberflächen |
| Wärmeübertragung | Kleine Auflagen | Flexibel, aber weniger hochwertig |
| Digitaler Textildruck | Detaillierte Stoffdesigns | Gut für komplexe Kunstwerke |
Wenn Sie ein Mauspad zu Hause anfertigen, können Sie Thermotransferpapier oder bedruckten Stoff verwenden.
Wenn Sie für den Verkauf produzieren, ist Sublimation in der Regel langfristig die bessere Wahl.
Schritt 5: Verkleben der Oberfläche mit dem Untergrund
Ein Mauspad versagt schnell, wenn sich der Stoff von der Unterlage löst.
Bei Heimwerkerprojekten wird häufig Sprühkleber oder Kontaktkleber verwendet.
Die Fabriken verwenden Heißlaminierung oder kontrollierte Klebstoffbeschichtung für eine stärkere Verbindung.
| Bonding-Methode | Anwendungsfall | Risiko |
|---|---|---|
| Sprühkleber | DIY-Muster | Ungleichmäßiger Kleber, Geruch |
| Kontakt Klebstoff | DIY oder Kleinserie | Schwer zu kontrollierende Dicke |
| Hitze-Laminierung | Produktion in der Fabrik | Benötigt die richtige Temperatur |
| Folienkaschierung | Hochwertige Produktion | Höhere Kosten, aber sauberere Bindung |
Die Klebeschicht sollte dünn und gleichmäßig sein.
Zu viel Klebstoff kann die Oberfläche steif machen.
Zu wenig Klebstoff kann zu Blasenbildung oder Ablösung führen.
Schritt 6: Schneiden Sie das Mauspad aus
Verwenden Sie zum Basteln ein Lineal, eine Schneidematte und ein scharfes Bastelmesser.
In den Fabriken erfolgt das Schneiden mit Stahlstempeln, CNC-Schneidemaschinen oder Laserschneidern.
| Schnittmethode | Am besten für | Vorteil |
|---|---|---|
| Bastelmesser | DIY | Geringe Kosten |
| Stanzen | Standardformen | Schnell und konsequent |
| CNC-Schneiden | Individuelle Formen | Flexibel und genau |
| Laserschneiden | Besondere Materialien | Saubere Kante auf ausgewählten Flächen |
Die werksseitige Toleranz für weiche Mauspads liegt in der Regel bei ±1-3 mm, je nach Material, Dicke und Größe.
Große Schreibtischunterlagen erfordern eine sorgfältigere Kontrolle, da kleine Schnittfehler besser sichtbar sind.
Schritt 7: Fertigstellung der Kante
Eine rohe Kante ist für einfache DIY-Pads akzeptabel.
Bei Produkten für den Einzelhandel oder für den Spielbereich verbessern genähte Kanten die Haltbarkeit.
| Kanten-Typ | Beste Verwendung | Kommentar |
|---|---|---|
| Rohschnitt | Selbstgemachte oder preisgünstige Promo-Pads | Sauber, kann aber ausfransen |
| Standardnähte | Einzelhandels-Pads | Bessere Haltbarkeit |
| Niedrigprofilierte Nähte | Spiele-Pads | Mehr Komfort |
| Unterirdische Nähte | Hochwertige esports-Pads | Die Kante sitzt tiefer als die Oberfläche |
Schlechte Nähte können den Arm reizen oder die Mausbewegung beeinträchtigen.
Bei hochwertigen Gaming-Pads sollte die Stichhöhe sorgfältig kontrolliert werden.
Schritt 8: Testen Sie das Mauspad
Eine Fabrik genehmigt ein Pad nicht, nur weil es gut aussieht.
Das Pad muss die Leistungs- und Aussehenstests bestehen.
| Prüfgegenstand | Was ist zu prüfen? |
|---|---|
| Ebenheit | Keine Locken oder Wellen |
| Grip | Rutscht nicht auf dem Schreibtisch |
| Oberfläche | Keine Falten, Flecken oder Beulen |
| Keine Unschärfe, Geisterbilder oder Farbverläufe | |
| Kante | Kein loser Faden oder Abblättern |
| Dicke | Mitte und Ecken sind konsistent |
| Geruch | Kein starker chemischer Geruch |
| Gleiten | X/Y-Bewegung fühlt sich konsistent an |
Testen Sie das Pad zum Selbermachen mit Ihrer normalen Maus.
Für die Produktion im Werk sollten Sie ein genehmigtes goldenes Muster aufbewahren und die Massenware damit vergleichen.
Schritt 9: Verpacken des Mauspads
Die Verpackung schützt das Kissen bei Lagerung und Versand.
Sie wirkt sich auch darauf aus, wie der Kunde das Produkt wahrnimmt.
| Verpackungsart | Am besten für |
|---|---|
| OPP-Tasche | Kostengünstige Großaufträge |
| Papierhülle | Umweltfreundliches Branding |
| Farbkasten | Produkte für den Einzelhandel |
| Röhrenbox | Große Untersetzer für den Schreibtisch |
| Kraftkarton | Minimalistische Premium-Verpackung |
| Geschenkpackung | Unternehmensbezogene Kampagnen |
Große Untersetzer für den Schreibtisch werden oft gerollt.
Hochwertige weiche Schaumstoffpads müssen möglicherweise flacher verpackt werden, um eine Verformung der Kanten zu vermeiden.
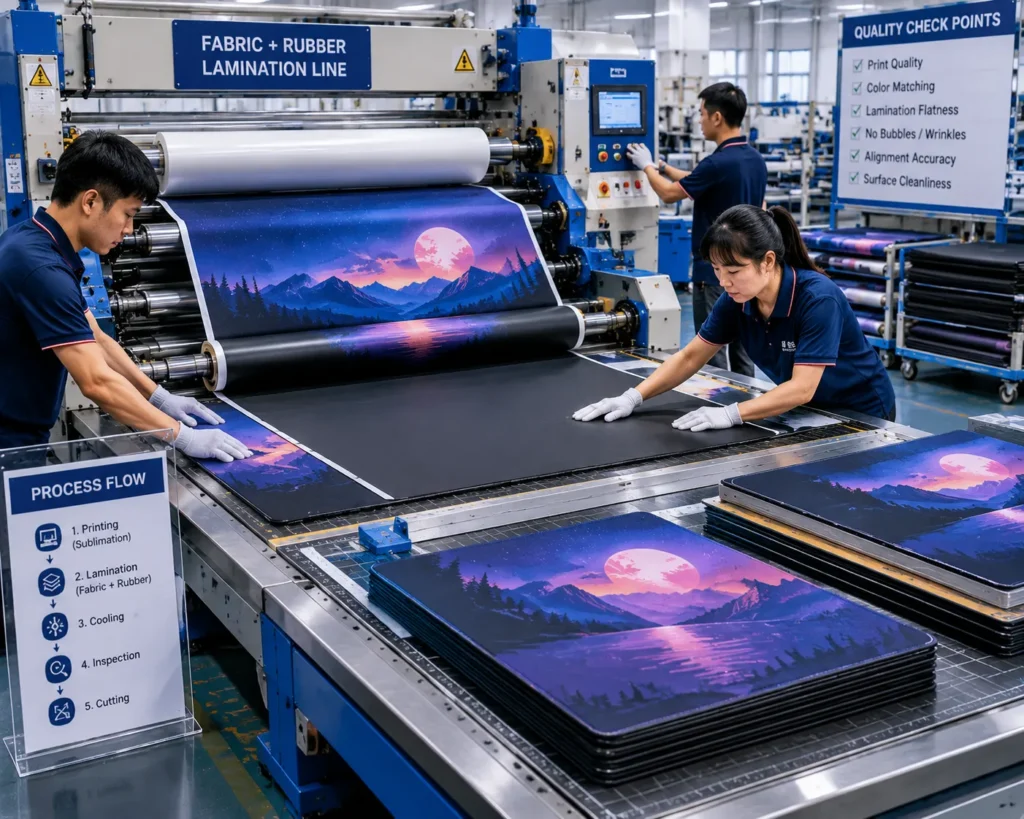
Fabrik Produktionsfluss
Im Folgenden finden Sie eine praktische Anleitung zur Herstellung von Mauspads nach Maß.
| Schritt | Fabrik-Aktion | Schlüsselkontrolle |
|---|---|---|
| 1 | Materialprüfung | Stoff, Gummi, Schaumstoff, Tinte |
| 2 | Korrekturlesen von Druckvorlagen | Größe, Beschnitt, Farbe |
| 3 | Oberflächendruck | Farbe und Details |
| 4 | Kaschierung | Verklebung und Ebenheit |
| 5 | Schneiden | Form und Toleranz |
| 6 | Nähen | Kantenhöhe und Fadenspannung |
| 7 | QC-Inspektion | Oberfläche, Druck, Griffigkeit, Geruch |
| 8 | Verpackung | Anti-Curl und Schutz |
| 9 | Verpackung im Karton | Sicherheit bei der Ausfuhr |
Dieser Prozess ist einfach zu verstehen, aber schwer perfekt zu wiederholen.
Deshalb ist Erfahrung bei der Herstellung von Mauspads wichtig.
Kostenaufschlüsselung: DIY vs. Fabrik
Die Kosten hängen von Material, Größe, Druck, Kantenbearbeitung und Verpackung ab.
Ein DIY-Pad kann billig sein, wenn Sie bereits Werkzeuge haben.
Die Fabrikproduktion ist kosteneffizienter, wenn Hunderte oder Tausende von Einheiten hergestellt werden.
| Kostentreiber | DIY Auswirkungen | Auswirkungen auf die Fabrik |
|---|---|---|
| Stoff | Gering bis mittel | Mittel |
| Grundstoff | Mittel | Hoch |
| Hoch für ein Stück | Niedriger pro Einheit in loser Schüttung | |
| Schneiden | Manuelle Zeit | Werkzeug- oder CNC-Kosten |
| Nähen | Schwierig zu Hause | Skalierbar in der Fabrik |
| Verpackung | Einfach | Treiber des Markenwerts |
| QC | Persönliches Urteil | Systematische Kontrolle |
Für eine Unterlage ist das Heimwerken praktisch.
Für eine Marke ist die Fabrikproduktion zuverlässiger.
Wie lange dauert es?
Ein selbstgemachtes Mauspad kann 1-3 Stunden dauern, wenn die Materialien bereitstehen.
Die Herstellung eines Musters dauert in der Regel 3-10 Tage, je nach Druck, Material und Naht.
| Projekttyp | Probezeit | Massenproduktion |
|---|---|---|
| DIY einfaches Mauspad | 1-3 Stunden | Nicht anwendbar |
| Einfach bedrucktes Mauspad | 3-5 Tage | 7-15 Tage |
| Genähtes Gaming-Pad | 7-10 Tage | 15-25 Tage |
| Hochwertiger Schaumstoff oder individuelle Form | 10-15 Tage | 20-35 Tage |
Die meisten Verzögerungen in den Fabriken ergeben sich aus Änderungen der Druckvorlagen, der Materialbeschaffung und der Verpackungsfreigabe.
Der Schneidevorgang selbst ist in der Regel schnell.
Schnelle Antwort
Um ein Mauspad selbst herzustellen, wählen Sie eine Stoffoberfläche, kleben Sie sie auf eine Gummi- oder Schaumstoffunterlage, schneiden Sie sie zurecht und bearbeiten Sie den Rand. Für ein einfaches Mauspad zum Selbermachen benötigen Sie Polyestergewebe, eine Gummiplatte, Sprühkleber und ein Bastelmesser. In einer Fabrik werden Mauspads durch Bedrucken des Gewebes, Laminieren auf Gummi oder Schaumstoff, Schneiden mit Stanzen oder CNC-Maschinen, Hinzufügen von genähten Kanten, Prüfen der Qualität und Verpacken des Endprodukts hergestellt. Gängige Stärken sind 2 mm, 3 mm, 4 mm und 5 mm, und die gängigen Größen reichen von 250 × 200 mm großen Bürounterlagen bis zu 900 × 400 mm großen Schreibtischmatten.
Abschließende Beratung durch die Fabrik
Die Herstellung eines Mauspads ist einfach.
Ein und dasselbe Mauspad 1.000 Mal mit gleichbleibender Farbe, Ebenheit, Kantenqualität und Gleitfähigkeit herzustellen, ist eine echte Herausforderung.
Wenn das Ziel der persönliche Gebrauch ist, ist DIY genug.
Wenn das Ziel die Markenbildung, der Einzelhandel, der Spielbetrieb oder der Großhandel ist, bietet die Fabrikproduktion eine bessere Wiederholbarkeit und Qualitätskontrolle.
Kann ich mein eigenes Mauspad zu Hause herstellen?
Ja. Sie können ein einfaches Mauspad aus Polyestergewebe, Gummifolie oder Schaumstoff, Klebstoff und einem scharfen Cutter herstellen. Allerdings können die selbstgemachten Pads in der Regel nicht mit der Laminierung, den Nähten und der Druckkonsistenz der Hersteller mithalten.
Was ist der beste Stoff für ein Mauspad?
Polyestergewebe ist eine der besten Optionen, da es sich gut für den Sublimationsdruck eignet. Für Spieleinlagen können je nach gewünschter Gleitfähigkeit Mikrogewebe, grober Kontrollstoff oder Lycra verwendet werden.
Welches Grundmaterial sollte ich für ein DIY-Mauspad verwenden?
Gummiplatten sind die einfachste Heimwerkerunterlage, da sie gut auf dem Schreibtisch haften. Für hochwertige Unterlagen können Fabriken Naturkautschuk, SBR-Gummi, PU-Schaum oder Poron-Schaum verwenden.
Wie dick sollte ein selbstgemachtes Mauspad sein?
Eine Dicke von 3 mm ist für die meisten Heimwerker- und Büromauspads praktisch. Für Gaming-Mauspads werden oft 4 mm verwendet, weil sie mehr Komfort und Stabilität auf dem Schreibtisch bieten.
Kann ich mein eigenes Design auf ein Mauspad drucken?
Ja. Für Heimwerker können Sie bedruckten Stoff oder die Methode der Wärmeübertragung verwenden. Für die professionelle Produktion wird für vollfarbige Stoffmauspads das Sublimationsverfahren bevorzugt, da es die Oberfläche glatt hält.
