
What People Really Want to Know
When someone searches “how to make your own mouse pad,” they may want a simple DIY project.
But many buyers are also exploring how индивидуальные коврики для мыши are made before contacting a factory, launching a brand, or ordering promotional products.
The real search intent usually falls into four groups:
| Search Intent | What the Reader Wants |
|---|---|
| DIY user | Make one mouse pad at home |
| Designer | Print artwork on a usable pad |
| Владелец бренда | Understand how custom pads are produced |
| Buyer | Compare DIY quality with factory production |
| Sourcing manager | Prepare specs for samples and bulk orders |
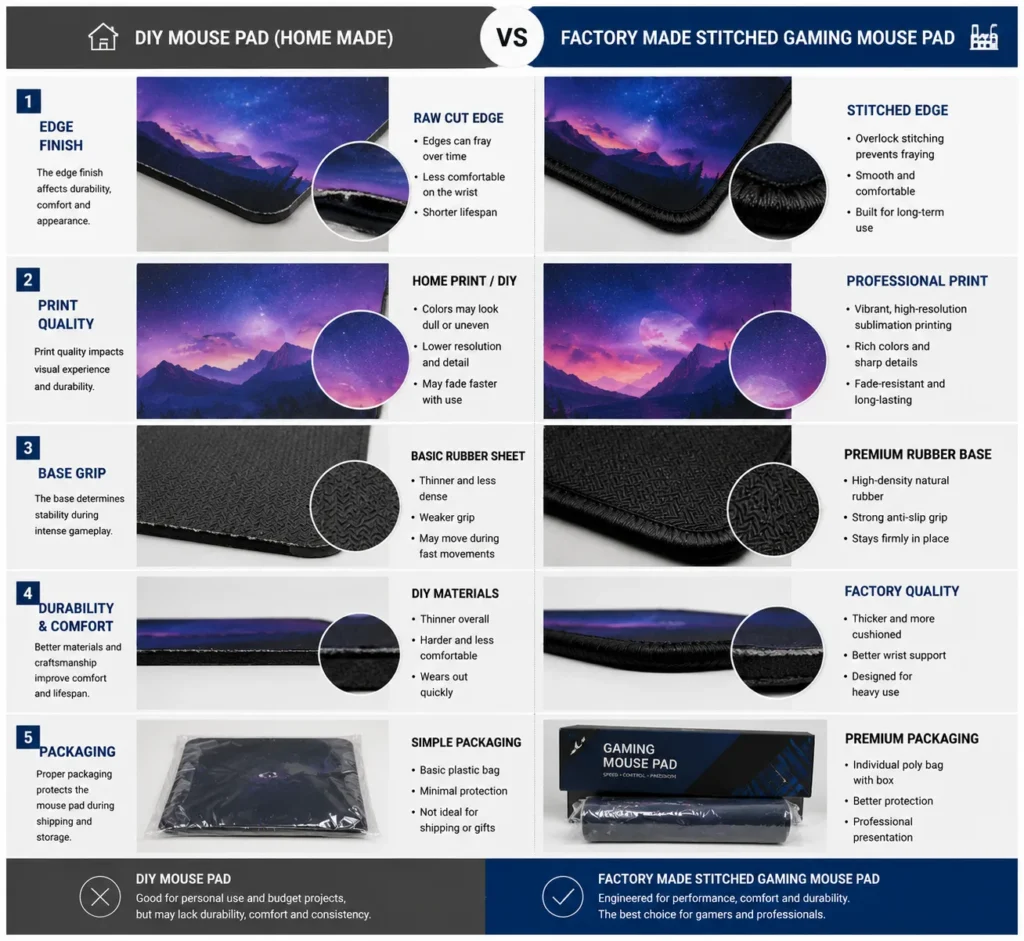
A homemade mouse pad can be simple.
A factory-made mouse pad must control surface texture, base grip, print durability, flatness, size tolerance, and packaging consistency.
What Is a Mouse Pad Made Of?
Most soft mouse pads use a layered structure: a fabric top, bonding layer, and rubber or foam base.
SteelSeries describes its QcK pads as using micro-woven cloth and a non-slip rubber base, with the QcK line reported as having over 15 million units sold.
Razer describes the Goliathus Chroma as using a micro-textured cloth surface for speed and control.
These examples show why surface and base selection matter.
A good mouse pad is not only a printed rectangle; it is a controlled tracking surface.
| Слой | Common Material | Purpose |
|---|---|---|
| Поверхность | Polyester cloth, microfiber, Lycra, woven fabric | Controls glide and tracking |
| Bonding layer | Heat adhesive or lamination film | Keeps layers together |
| База | Натуральный каучук, SBR-каучук, пенополиуретан, пенополиуретан типа Poron | Provides grip and cushioning |
| Край | Raw cut or stitched edge | Prevents fraying |
| Упаковка | Bag, sleeve, box, tube | Protects shape and surface |
DIY Method vs Factory Method
You can make your own mouse pad at home with fabric, rubber sheet, adhesive, and a cutting tool.
But factory production gives better consistency because every step is measured.
| Артикул | DIY Mouse Pad | Factory Mouse Pad |
|---|---|---|
| Поверхность | Fabric or printed cloth | Tested fabric surface |
| База | Rubber sheet, foam sheet, cork | Rubber, SBR, PU foam, Poron-style foam |
| Bonding | Spray glue or contact adhesive | Heat lamination or industrial adhesive |
| Резка | Scissors or craft knife | Die cutting, CNC cutting, laser cutting |
| Край | Usually raw edge | Raw, stitched, or low-profile stitching |
| Quality | Depends on handwork | Batch-level QC inspection |
DIY is good for learning.
Factory production is better for retail, branding, gaming, and repeat orders.
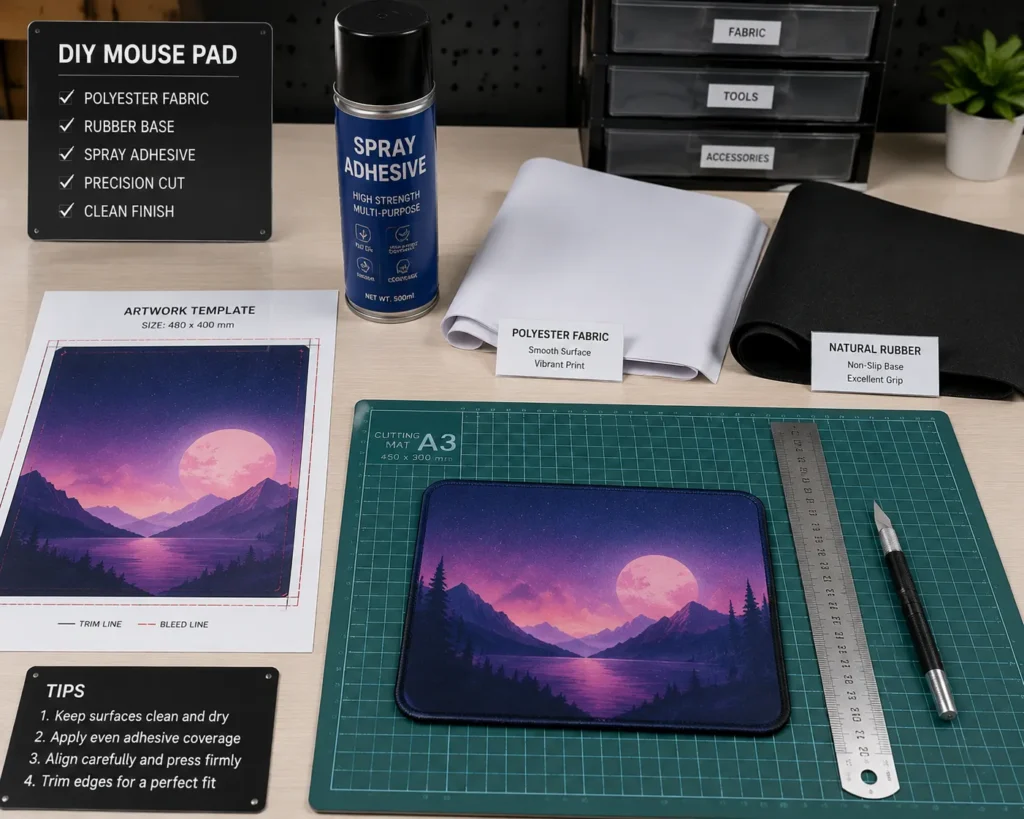
Materials You Need to Make Your Own Mouse Pad
For a basic DIY mouse pad, you need a top surface, a base layer, adhesive, and cutting tools.
For a professional индивидуальный коврик для мыши, the same logic applies, but materials must be production-grade.
| Материал | DIY Option | Factory Option |
|---|---|---|
| Top surface | Polyester cloth, printed fabric | Micro-woven cloth, control fabric, Lycra |
| База | Rubber sheet, foam sheet | Natural rubber, SBR, PU foam |
| Adhesive | Spray adhesive | Heat lamination adhesive |
| Резка | Cutter, ruler, mat | Steel die or CNC cutter |
| Edge finish | Необработанный срез | Stitched edge or sub-surface stitching |
For printing, polyester fabric is preferred because dye sublimation bonds best with polyester fibers under heat.
This is why many custom printed mouse pads use polyester cloth rather than cotton.
Step 1: Choose the Surface Fabric
The surface is the most important part of the user experience.
It affects speed, control, stopping power, and hand feel.
| Тип поверхности | Почувствуйте себя | Лучшее для |
|---|---|---|
| Smooth polyester | Balanced and economical | DIY and office pads |
| Micro-woven cloth | Consistent tracking | Gaming and retail pads |
| Ткань грубого плетения | More friction and control | FPS control pads |
| Lycra | Fast and slick | Speed-style gaming pads |
| PU кожа | Premium office look | Корпоративные подарки |
| Hard plastic or glass | Very fast | Specialty gaming pads |
For DIY use, smooth polyester cloth is practical.
For factory production, buyers should request fabric samples because two fabrics may look similar but perform differently.
Step 2: Choose the Base
The base decides whether the mouse pad stays flat and grips the desk.
A weak base will slide, curl, or deform.
Rogers describes PORON polyurethane foams as having excellent compression set resistance, which supports long-term performance in cushioning applications.
That is why Poron-style foam is often used in premium soft-base mouse pad projects.
| Материал основания | Преимущество | Ограничение |
|---|---|---|
| Натуральный каучук | Strong grip and elasticity | May have odor |
| SBR резина | Cost-effective and stable | Less premium feel |
| пенополиуретан | Soft and lightweight | Needs density control |
| Поролон | Good rebound and compression recovery | Higher cost |
| Cork | DIY-friendly | Lower gaming performance |
For DIY, a rubber sheet is easiest.
For factory production, натуральный каучук and SBR rubber are common for standard pads, while PU and Poron-style foam are used for premium models.
Step 3: Prepare the Artwork
If you want a printed mouse pad, prepare the artwork before cutting.
The artwork should be larger than the final size because cutting removes the outer edge.
Factory artwork standards:
| Артикул | Рекомендуемый стандарт |
|---|---|
| Разрешение | 300 DPI |
| Color mode | CMYK or Pantone reference |
| Область кровотечения | 3-5 мм |
| File type | AI, PDF, PSD, TIFF, PNG |
| Text placement | Away from edge and stitching |
| Logo position | Confirm with final size template |
For a DIY pad, you can print fabric at home or use a fabric printing service.
For factory production, the print file should be checked before sampling to avoid blurry logos or cut-off artwork.
Step 4: Print the Surface
The most common factory printing method for cloth mouse pads is dye sublimation.
Sublimation uses heat to transfer dye into polyester fibers, which helps keep the surface smooth instead of adding a thick ink layer on top.
This matters because mouse pads need stable glide.
A raised ink layer can change surface friction.
| Метод печати | Лучшее для | Примечание завода |
|---|---|---|
| Dye sublimation | Full-color cloth pads | Smooth feel, vivid design |
| Трафаретная печать | Простые логотипы | Good for large low-color orders |
| УФ-печать | Hard pads or PU leather | Works on rigid surfaces |
| Теплопередача | Small runs | Гибкий, но менее премиальный |
| Цифровая печать на текстиле | Detailed fabric designs | Good for complex artwork |
If you are making one mouse pad at home, you can use heat transfer paper or printed fabric.
If you are manufacturing for sale, sublimation is usually the better long-term choice.
Step 5: Bond the Surface to the Base
A mouse pad fails quickly if the fabric separates from the base.
DIY projects often use spray adhesive or contact glue.
Factories use heat lamination or controlled adhesive coating for stronger bonding.
| Bonding Method | Пример использования | Risk |
|---|---|---|
| Spray adhesive | DIY sample | Uneven glue, odor |
| Contact adhesive | DIY or small batch | Hard to control thickness |
| Heat lamination | Factory production | Needs correct temperature |
| Film lamination | Premium production | Higher cost but cleaner bond |
The bonding layer should be thin and even.
Too much adhesive can make the surface stiff.
Too little adhesive can cause bubbles or peeling.
Step 6: Cut the Mouse Pad
For DIY, use a ruler, cutting mat, and sharp craft knife.
For factories, cutting is done with steel-rule dies, CNC cutters, or laser cutters.
| Cutting Method | Лучшее для | Преимущество |
|---|---|---|
| Craft knife | DIY | Low cost |
| Die cutting | Standard shapes | Fast and consistent |
| CNC cutting | Custom shapes | Flexible and accurate |
| Laser cutting | Special materials | Clean edge on selected surfaces |
Factory tolerance for soft mouse pads is commonly around ±1–3 mm depending on material, thickness, and size.
Large desk mats need more careful control because small cutting errors are more visible.
Step 7: Finish the Edge
A raw edge is acceptable for simple DIY pads.
For retail or gaming products, stitched edges improve durability.
| Тип кромки | Лучшее применение | Комментарий |
|---|---|---|
| Необработанный срез | DIY or low-cost promo pads | Clean but may fray |
| Standard stitching | Retail pads | Повышенная прочность |
| Низкопрофильная строчка | Игровые коврики | Более комфортный |
| Подповерхностный шов | Premium esports pads | Edge sits lower than surface |
Poor stitching can irritate the arm or affect mouse movement.
For premium gaming pads, stitch height should be controlled carefully.
Step 8: Test the Mouse Pad
A factory does not approve a pad just because it looks good.
The pad must pass performance and appearance checks.
| Test Item | What to Check |
|---|---|
| Плоскость | No curl or waves |
| Grip | Does not slide on desk |
| Поверхность | No wrinkles, stains, or bumps |
| No blur, ghosting, or color banding | |
| Край | No loose thread or peeling |
| Толщина | Center and corners are consistent |
| Запах | Нет сильного химического запаха |
| Glide | X/Y movement feels consistent |
For DIY, test the pad with your normal mouse.
For factory production, keep an approved golden sample and compare bulk goods against it.
Step 9: Package the Mouse Pad
Packaging protects the pad during storage and shipping.
It also affects how the customer perceives the product.
| Тип упаковки | Лучшее для |
|---|---|
| мешок OPP | Недорогие оптовые заказы |
| Бумажная втулка | Eco-friendly branding |
| Цветная коробка | Retail products |
| Коробка для трубок | Большие настольные коврики |
| Крафтовая коробка | Minimalist premium packaging |
| Gift box | Corporate campaigns |
Большие настольные коврики are often rolled.
Premium soft foam pads may need flatter packaging to reduce curl or edge deformation.
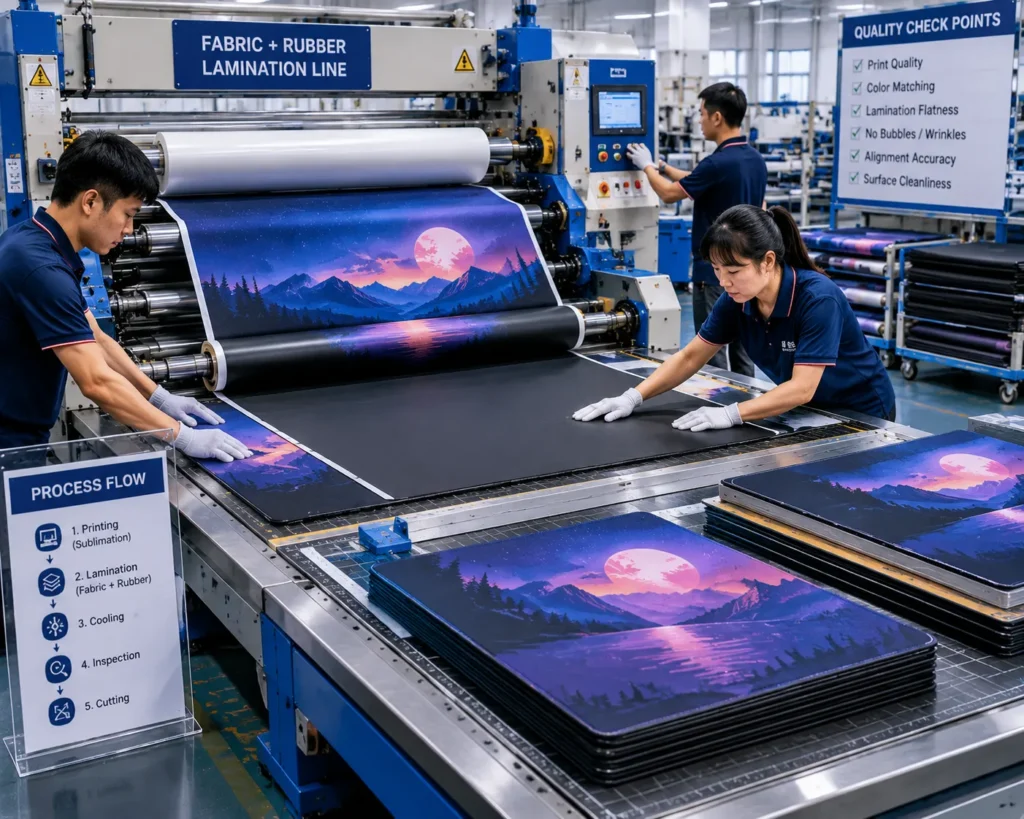
Factory Production Flow
Below is a practical factory flow for making custom mouse pads.
| Шаг | Factory Action | Key Control |
|---|---|---|
| 1 | Проверка материалов | Fabric, rubber, foam, ink |
| 2 | Проверка художественных работ | Size, bleed, color |
| 3 | Surface printing | Color and detail |
| 4 | Ламинирование | Bonding and flatness |
| 5 | Резка | Shape and tolerance |
| 6 | Сшивание | Edge height and thread tension |
| 7 | контроль качества | Surface, print, grip, odor |
| 8 | Упаковка | Anti-curl and protection |
| 9 | Carton packing | Export safety |
This process is simple to understand but difficult to repeat perfectly.
That is why experience matters in mouse pad manufacturing.
Cost Breakdown: DIY vs Factory
The cost depends on materials, size, printing, edge finish, and packaging.
A DIY pad can be cheap if you already have tools.
Factory production is more cost-efficient when making hundreds or thousands of units.
| Cost Driver | DIY Impact | Factory Impact |
|---|---|---|
| Fabric | От низкого до среднего | Средний |
| Base material | Средний | Высокий |
| Печать | High for one piece | Lower per unit in bulk |
| Резка | Manual time | Die or CNC cost |
| Сшивание | Difficult at home | Scalable in factory |
| Упаковка | Simple | Brand value driver |
| QC | Personal judgment | Systematic inspection |
For one pad, DIY is practical.
For a brand, factory production is more reliable.
How Long Does It Take?
A DIY mouse pad may take 1–3 hours if materials are ready.
A factory sample usually takes 3–10 days depending on printing, material, and stitching.
| Тип проекта | Время выборки | Производство сыпучих продуктов |
|---|---|---|
| DIY plain mouse pad | 1–3 hours | Not applicable |
| Simple printed mouse pad | 3-5 дней | 7-15 дней |
| Stitched gaming pad | 7-10 дней | 15-25 дней |
| Premium foam or custom shape | 10-15 дней | 20-35 дней |
Most factory delays come from artwork changes, material sourcing, and packaging approval.
The cutting process itself is usually fast.
Quick Answer
To make your own mouse pad, choose a fabric surface, bond it to a rubber or foam base, cut it to size, and finish the edge. For a basic DIY mouse pad, use polyester fabric, rubber sheet, spray adhesive, and a craft knife. In a factory, mouse pads are made by printing the fabric, laminating it to rubber or foam, cutting it with dies or CNC machines, adding stitched edges, inspecting quality, and packaging the final product. Common thicknesses are 2 mm, 3 mm, 4 mm, and 5 mm, while popular sizes range from 250 × 200 mm office pads to 900 × 400 mm desk mats.
Final Factory Advice
Making one mouse pad is easy.
Making the same mouse pad 1,000 times with stable color, flatness, edge quality, and glide is the real challenge.
If the goal is personal use, DIY is enough.
If the goal is branding, retail, gaming, or wholesale sales, factory production gives better repeatability and quality control.
Can I make my own mouse pad at home?
Yes. You can make a simple mouse pad using polyester fabric, rubber sheet or foam, adhesive, and a sharp cutter. However, DIY pads usually cannot match factory-level lamination, stitching, and print consistency.
What is the best fabric for making a mouse pad?
Polyester fabric is one of the best options because it works well with dye sublimation printing. For gaming pads, micro-woven cloth, rough control fabric, or Lycra may be used depending on the desired glide.
What base material should I use for a DIY mouse pad?
Rubber sheet is the easiest DIY base because it grips the desk well. For premium pads, factories may use natural rubber, SBR rubber, PU foam, or Poron-style foam.
How thick should a homemade mouse pad be?
A thickness of 3 mm is practical for most DIY and office mouse pads. Gaming mouse pads often use 4 mm because it provides more comfort and desk stability.
Can I print my own design on a mouse pad?
Yes. For DIY, you can use printed fabric or heat transfer methods. For professional production, dye sublimation is preferred for full-color cloth mouse pads because it keeps the surface smooth.
